
[lighty.io] BGP Route Reflector
The main goal of this project is to create a Docker container, that can be connected to an existing network and provide route-reflector functionality. We are using OpenDaylight-BGP plugin for this demonstration.
What is a BGP route-reflector?
The Border Gateway Protocol (BGP) is a routing protocol, designed for TCP/IP internets. Since the Internal BGP (IBGP) peers must follow the rule:
“don’t forward routing information received from one IBGP peer to another IBGP peer”
To prevent loops, all BGP speakers within a single autonomous system must be fully meshed. This way, external routing information can be re-distributed to all other routers within that autonomous system. This operation often represents a serious scaling problem.
The design of a method known as “route reflection“ was introduced, to alleviate the need for “full mesh” peering.
This approach allows one IBGP to act as a route-reflector and all IBGP peers will send routing information only to that peer. This peer will, in turn, forward it to all other peers. A full-mesh topology is changed to a star topology.
Some background on Networking
Let’s take an example of the following topology:
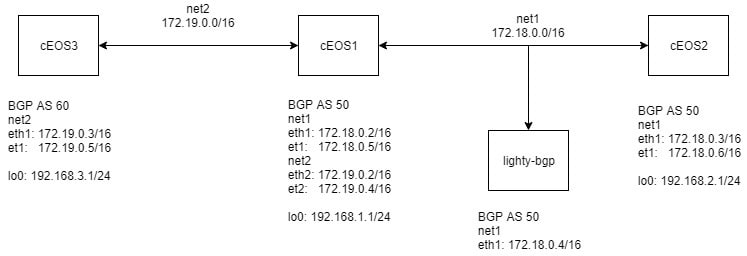
BGP Router Reflector Topology – Example
Firstly, let’s break down what we see in the picture. We have 4 docker containers connected with two docker networks. Typically, networks with 2 nodes connected use /31 or /30 masks. However, since Docker also connects the host to the network (with .1 host address), these masks are not applicable in this case.
We will use Docker auto-generated networks in this example.
cEOS Nodes
cEOS (containerized EOS) is an operating system for network devices from Arista (similar to IOS from Cisco). cEOS with “common” CLI, distribution and a Docker container, provides an easy to use solution for this demo. An important thing for this example is, that cEOS creates a port for every ethX port (except eth0), which is bridged with it. It automatically names it etX. These newly created etX ports are accessible and configurable from cEOS Cli and on start are in switching mode (meaning they don’t have an IP address assigned). We will come back to these ports during the configuration part.
If you are interested in how cEOS works you can find is here and the Cli command here.
Addresses for this example are as follows:
net1 (172.18.0.0/16)
- 172.18.0.1 – host, assigned automatically on network creation
- 172.18.0.2 – cEOS1, first container started in the network, assigned automatically on start
- 172.18.0.3 – cEOS2, second container started in the network, assigned automatically on start
- 172.18.0.4 – lighty–bgp, third container started in the network, assigned automatically on start
- 172.18.0.5 – cEOS1, configured manually via CLI
- 172.18.0.6 – cEOS2, configured manually via CLI
net2 (172.19.0.0/16)
- 172.19.0.1 – host, assigned automatically on network creation
- 172.19.0.2 – cEOS1, first container started in the network, assigned automatically on start
- 172.19.0.3 – cEOS3, second container started in the network, assigned automatically on start
- 172.19.0.4 – cEOS1, configured manually via CLI
- 172.19.0.4 – cEOS3, configured manually via CLI
Additionally, we are using loopbacks to simulate connected networks, which will be the target of routing information exchange and serve us as a connectivity test tools:
- cEOS1 – 192.168.1.0/24
- cEOS2 – 192.168.2.0/24
- cEOS3 – 192.168.3.0/24
Routing
Our goal is to be able to reach the loopback networks between themselves. For that, we need BGP to advertise loopback networks between nodes.
In this example, we are using two autonomous systems to have both types of peers (IBGP and EBGP).
- AS 50 – cEOS1, cEOS2, lighty bgp
- AS 60 – cEOS3
To demonstrate route-reflector functionality cEOS1 and cEOS2 doens’t make a IBGP pair but create pair with lighty-bgp instead which act as a route-reflector. cEOS1 and cEOS3 creates EBGP pair.
Container with lighty-bgp MUST NOT be used as forwarding node, since it doesn’t know how to manipulate the routing table.
Prerequisites
lighty-BGP plugin
The plugin provides a “starting point” for ODL BGP bundles. We will use a Docker image, linked also in the next steps.
Learn more about lighty.io.
ODL BGP
BGPCEP module in ODL is capable to act as a BGP peer.
It provides the following features:
- Establish peer connection
- Receive routing information from a peer, apply policies and store it in routing information base (RIB)
- Forward routing information to connected peers
- Act as a route-reflector
- Route injection
Unsupported operations:
- Best path computation
- Making changes in the routing table
Configuration
0. Before continuing, make sure that you have Docker and Postman installed.
1. Download the lighty BGP Docker image. PANTHEON.tech has its own docker repository, where you can access the image.
sudo docker pull pantheontech/lighty-rr
2. Download the Docker image of arista cEOS (I was using version 4.20.5F) and install it as ceosimage:4.20.5F:
sudo docker import cEOS-lab.tar.xz ceosimage:4.20.5F
Prepare the Docker environment for our demo:
a) Create Docker networks:
sudo docker network create net1
sudo docker network create net2
b) Create containers:
sudo docker create --name=bgp -- priviledged -e INTFTYPE=eth -i -t pantheontech/lighty-rr:9.1.2.-dev
sudo docker create --name=ceos1 --privileged -e CEOS=1 -e container=docker -e EOS_PLATFORM=ceossim -e SKIP_ZEROTOUCH_BARRIER_IN_SYSDBINIT=1 -e ETBA=1 -e INTFTYPE=eth -i -t ceosimage:4.20.5F /sbin/init
sudo docker create --name=ceos2 --privileged -e CEOS=2 -e container=docker -e EOS_PLATFORM=ceossim -e SKIP_ZEROTOUCH_BARRIER_IN_SYSDBINIT=1 -e ETBA=1 -e INTFTYPE=eth -i -t ceosimage:4.20.5F /sbin/init
sudo docker create --name=ceos3 --privileged -e CEOS=3 -e container=docker -e EOS_PLATFORM=ceossim -e SKIP_ZEROTOUCH_BARRIER_IN_SYSDBINIT=1 -e ETBA=1 -e INTFTYPE=eth -i -t ceosimage:4.20.5F /sbin/init
c) Connect containers with networks:
sudo docker network connect net1 ceos1
sudo docker network connect net1 ceos2
sudo docker network connect net1 bgp
sudo docker network connect net2 ceos1
sudo docker network connect net2 ceos3
d) Start containers (prevent arp flux):
sudo docker start ceos1
sudo docker start ceos2
sudo docker start ceos3
sudo docker start bgp
sudo docker exec -ti ceos1 sysctl net.ipv4.conf.all.forwarding=1
Right now, we have our environment ready. We can check available ports in the container:
~$ sudo docker exec ceos1 ip addr
1: lo: <LOOPBACK,UP,LOWER_UP> mtu 65536 qdisc noqueue state UNKNOWN group default qlen 1000
    link/loopback 00:00:00:00:00:00 brd 00:00:00:00:00:00
    inet 127.0.0.1/24 scope host lo
       valid_lft forever preferred_lft forever
    inet6 ::1/128 scope host
       valid_lft forever preferred_lft forever
2: fwd0: <BROADCAST,MULTICAST,NOARP,UP,LOWER_UP> mtu 1488 qdisc pfifo_fast state UNKNOWN group default qlen 1000
    link/ether f2:f8:bb:5f:77:bd brd ff:ff:ff:ff:ff:ff
    inet6 fe80::f0f8:bbff:fe5f:77bd/64 scope link
       valid_lft forever preferred_lft forever
3: et1: <BROADCAST,MULTICAST,UP,LOWER_UP> mtu 9214 qdisc pfifo_fast state UP group default qlen 1000
    link/ether 02:42:ac:11:3e:b8 brd ff:ff:ff:ff:ff:ff
4: et2: <BROADCAST,MULTICAST,UP,LOWER_UP> mtu 9214 qdisc pfifo_fast state UP group default qlen 1000
    link/ether 02:42:ac:11:3e:b8 brd ff:ff:ff:ff:ff:ff
5: fabric: <BROADCAST,MULTICAST,UP,LOWER_UP> mtu 10000 qdisc pfifo_fast state UNKNOWN group default qlen 1000
    link/ether 02:42:ac:11:3e:b8 brd ff:ff:ff:ff:ff:ff
    inet6 fe80::42:acff:fe11:3eb8/64 scope link
       valid_lft forever preferred_lft forever
6: eth0@if7: <BROADCAST,MULTICAST,UP,LOWER_UP> mtu 1500 qdisc noqueue state UP group default
    link/ether 02:42:ac:11:00:02 brd ff:ff:ff:ff:ff:ff link-netnsid 0
    inet 172.17.0.2/16 scope global eth0
       valid_lft forever preferred_lft forever
    inet6 fe80::42:acff:fe11:2/64 scope link
       valid_lft forever preferred_lft forever
7: cpu: <BROADCAST,MULTICAST,UP,LOWER_UP> mtu 1500 qdisc pfifo_fast state UNKNOWN group default qlen 1000
    link/ether 22:ff:2a:84:50:f2 brd ff:ff:ff:ff:ff:ff
    inet6 fe80::20ff:2aff:fe84:50f2/64 scope link
       valid_lft forever preferred_lft forever
8: eth1@if9: <BROADCAST,MULTICAST,UP,LOWER_UP> mtu 1500 qdisc noqueue state UP group default
    link/ether 02:42:ac:12:00:02 brd ff:ff:ff:ff:ff:ff link-netnsid 0
    inet 172.18.0.2/16 scope global eth1
       valid_lft forever preferred_lft forever
    inet6 fe80::42:acff:fe12:2/64 scope link
       valid_lft forever preferred_lft forever
10: eth2@if11: <BROADCAST,MULTICAST,UP,LOWER_UP> mtu 1500 qdisc noqueue state UP group default
    link/ether 02:42:ac:13:00:02 brd ff:ff:ff:ff:ff:ff link-netnsid 0
    inet 172.19.0.2/16 scope global eth2
       valid_lft forever preferred_lft forever
    inet6 fe80::42:acff:fe13:2/64 scope link
       valid_lft forever preferred_lft forever
Here, we can see both eth and et port we mentioned earlier. et ports don’t have an IP address, because we didn’t configure it yet.
In this state, only connections to directly connected networks are working.
Configure Arista nodes
Firstly, configure IP addresses to etX ports from the topology picture are created by EOS and only accessible from CLI. Therefore, we are using IP addresses from etX ports.
Then, configure BGP and BGP neighbors. Furthermore, configure EBGP neighbors (different AS) between:
- cEOS1 and cEOS3
- IBGP neighbors between cEOS1, cEOS2 & lighty-BGP
The following command doesn’t work as copy-paste. The first command must be executed separately and the rest may be pasted:
- ceos1
sudo docker exec -ti ceos1 Cli
enable
configure terminal
hostname ceos1
ip routing
interface eth1
no switchport
ip address 172.18.0.5/16
interface eth2
no switchport
ip address 172.19.0.4/16
exit
router bgp 50
neighbor 172.18.0.4 remote-as 50
neighbor 172.18.0.4 next-hop-self
neighbor 172.19.0.5 remote-as 60
neighbor 172.19.0.5 next-hop-self
address-family ipv4
neighbor 172.18.0.4 activate
neighbor 172.19.0.5 activate
exit
exit
exit
exit
- ceos2
sudo docker exec -ti ceos2 Cli
enable
configure terminal
hostname ceos2
ip routing
interface eth1
no swichport
ip address 172.18.0.6/16
exit
router bgp 50
neighbor 172.18.0.4 remote-as 50
neighbor 172.18.0.4 next-hop-self
address-family ipv4
neighbor 172.18.0.4 activate
exit
exit
exit
exit
- ceos3
sudo docker exec -ti ceos3 Cli
enable
configure terminal
hostname ceos3
ip routing
interface eth1
no switchport
ip address 172.19.0.5/16
exit
router bgp 60
neighbor 172.19.0.4 remote-as 50
neighbor 172.19.0.4 next-hop-self
address-family ipv4
neighbor 172.19.0.4 activate
exit
exit
exit
exit
Now we have BGP configured and peering between cEOS1 and cEOS3 should be up. Rest of connections are idle.
~$ sudo docker exec -ti ceos1 Cli
ceos1>enable
ceos1#show ip bgp summary
BGP summary information for VRF default
Router identifier 172.19.0.4, local AS number 50
Neighbor Status Codes: m - Under maintenance
  Neighbor         V  AS           MsgRcvd   MsgSent  InQ OutQ  Up/Down State  PfxRcd PfxAcc
  172.18.0.4       4  50                 7         7    0    0 00:00:23 Connect
  172.19.0.5       4  60                 7         7    0    0 00:03:57 Estab  0      0
ceos1#
Also, routing tables contain only directly connected routes:
~$ sudo docker exec -ti ceos1 Cli
ceos1>enable
ceos1#show ip route

VRF: default
Codes: C - connected, S - static, K - kernel,
       O - OSPF, IA - OSPF inter area, E1 - OSPF external type 1,
       E2 - OSPF external type 2, N1 - OSPF NSSA external type 1,
       N2 - OSPF NSSA external type2, B I - iBGP, B E - eBGP,
       R - RIP, I L1 - IS-IS level 1, I L2 - IS-IS level 2,
       O3 - OSPFv3, A B - BGP Aggregate, A O - OSPF Summary,
       NG - Nexthop Group Static Route, V - VXLAN Control Service,
       DH - DHCP client installed default route, M - Martian

Gateway of last resort is not set

 C      172.18.0.0/16 is directly connected, Ethernet1
 C      172.19.0.0/16 is directly connected, Ethernet2

ceos1#
5. Add some loopbacks to simulate networks and propagate them via BGP:
ceos1 -sudo docker exec -ti ceos1 Cli
enable
configure terminal
interface lo0
ip address 192.168.1.1/24
exit
router bgp 50
network 192.168.1.0/24
exit
exit
exit
ceos2 -sudo docker exec -ti ceos2 Cli
enable
configure terminal
interface lo0
ip address 192.168.2.1/24
exit
router bgp 50
network 192.168.2.0/24
exit
exit
exit
ceos3 -sudo docker exec -ti ceos3 Cli
enable
configure terminal
interface lo0
ip address 192.168.3.1/24
exit
router bgp 60
network 192.168.3.0/24
exit
exit
exit
Since we still didn’t configure lighty-bgp, we only receive the exchanged information between cEOS1 and cEOS3. Any connection from cEOS2 is still not registered:
~$ sudo docker exec -ti ceos1 Cli
ceos1>enable
ceos1#show ip route

VRF: default
Codes: C - connected, S - static, K - kernel,
       O - OSPF, IA - OSPF inter area, E1 - OSPF external type 1,
       E2 - OSPF external type 2, N1 - OSPF NSSA external type 1,
       N2 - OSPF NSSA external type2, B I - iBGP, B E - eBGP,
       R - RIP, I L1 - IS-IS level 1, I L2 - IS-IS level 2,
       O3 - OSPFv3, A B - BGP Aggregate, A O - OSPF Summary,
       NG - Nexthop Group Static Route, V - VXLAN Control Service,
       DH - DHCP client installed default route, M - Martian

Gateway of last resort is not set

 C      172.18.0.0/16 is directly connected, Ethernet1
 C      172.19.0.0/16 is directly connected, Ethernet2
 C      192.168.1.0/24 is directly connected, Loopback0
 B E    192.168.3.0/24 [200/0] via 172.19.0.5, Ethernet2

ceos1#
Since cEOS3 network is known to cEOS1, its connectivity should work:
~$ sudo docker exec -ti ceos1 Cli
ceos1>enable
ceos1#ping 192.168.3.1 source lo0
PING 192.168.3.1 (192.168.3.1) from 192.168.1.1 : 72(100) bytes of data.
80 bytes from 192.168.3.1: icmp_seq=1 ttl=64 time=18.1 ms
80 bytes from 192.168.3.1: icmp_seq=2 ttl=64 time=19.8 ms
80 bytes from 192.168.3.1: icmp_seq=3 ttl=64 time=67.5 ms
80 bytes from 192.168.3.1: icmp_seq=4 ttl=64 time=48.7 ms
80 bytes from 192.168.3.1: icmp_seq=5 ttl=64 time=30.8 ms

--- 192.168.3.1 ping statistics ---
5 packets transmitted, 5 received, 0% packet loss, time 85ms
rtt min/avg/max/mdev = 18.160/37.050/67.542/18.747 ms, pipe 3, ipg/ewma 21.436/27.970 ms
ceos1#
Be sure to use the ping command with “source lo0” part!
Without it, the source IP address will be taken from the outgoing port (172.19.0.2 in this case) and you could be misled, that cEOS3 knows about 192.168.2.0/24 network.
Just to verify that cEOS1 doesn’t know how to reach cEOS2 network:
~$ sudo docker exec -ti ceos1 Cli
ceos1>enable
ceos1#ping 192.168.2.1 source lo0
PING 192.168.2.1 (192.168.2.1) from 192.168.1.1 : 72(100) bytes of data.
From 192.168.1.1 icmp_seq=1 Destination Host Unreachable
From 192.168.1.1 icmp_seq=2 Destination Host Unreachable
From 192.168.1.1 icmp_seq=3 Destination Host Unreachable
From 192.168.1.1 icmp_seq=4 Destination Host Unreachable

--- 192.168.2.1 ping statistics ---
5 packets transmitted, 0 received, +4 errors, 100% packet loss, time 4015ms
pipe 4
ceos1#
Configure BGP
Here comes the crucial part. We will configure peers on lighty-BGP, which establishes a connection and performs routing information exchange. There is a lot of stuff to configure, so I am going to add comments to break it down a little here.
From lighty-BGP postman collection, use “BGP protocols” to configure BGP and neighbors.
Now, you can verify that all connections should be up & running:
~$ sudo docker exec -ti ceos1 Cli
ceos1>enable
ceos1#show ip bgp summary
BGP summary information for VRF default
Router identifier 172.19.0.4, local AS number 50
Neighbor Status Codes: m - Under maintenance
  Neighbor         V  AS           MsgRcvd   MsgSent  InQ OutQ  Up/Down State  PfxRcd PfxAcc
  172.18.0.4       4  50                33        37    0    0 00:00:53 Estab  1      1
  172.19.0.5       4  60                50        53    0    0 00:45:28 Estab  1      1
ceos1#show ip route

VRF: default
Codes: C - connected, S - static, K - kernel,
       O - OSPF, IA - OSPF inter area, E1 - OSPF external type 1,
       E2 - OSPF external type 2, N1 - OSPF NSSA external type 1,
       N2 - OSPF NSSA external type2, B I - iBGP, B E - eBGP,
       R - RIP, I L1 - IS-IS level 1, I L2 - IS-IS level 2,
       O3 - OSPFv3, A B - BGP Aggregate, A O - OSPF Summary,
       NG - Nexthop Group Static Route, V - VXLAN Control Service,
       DH - DHCP client installed default route, M - Martian

Gateway of last resort is not set

 C      172.18.0.0/16 is directly connected, Ethernet1
 C      172.19.0.0/16 is directly connected, Ethernet2
 C      192.168.1.0/24 is directly connected, Loopback0
 B I    192.168.2.0/24 [200/0] via 172.18.0.3, Ethernet1
 B E    192.168.3.0/24 [200/0] via 172.19.0.5, Ethernet2

ceos1#ping 192.168.2.1 source lo0
PING 192.168.2.1 (192.168.2.1) from 192.168.1.1 : 72(100) bytes of data.
80 bytes from 192.168.2.1: icmp_seq=1 ttl=64 time=9.67 ms

--- 192.168.2.1 ping statistics ---
5 packets transmitted, 1 received, 80% packet loss, time 47ms
rtt min/avg/max/mdev = 9.672/9.672/9.672/0.000 ms, ipg/ewma 11.772/9.672 ms
ceos1#
Furthermore, you can verify the advertised routes in BGP datastore with a second request in the collection. That is the GET “OPER rib” of BGP-rib entries.
7. Now, try to ping from ceos2|3 to ceos2|3
sudo docker exec -ti ceos[2|3] Cli
ena
ping 192.168.[2|3].1 source lo0
Conclusion
Route reflection provides the network with a feature for BGP speakers, to directly peer with a route reflector. We have successfully managed to simulate a route reflector with the help of the ODL-BGP plugin, lighty.io & some additional configuration.
If you’re interested in a commercial solution, feel free to contact us.
Matej Perina
You can contact us at https://pantheon.tech/
Explore our Pantheon GitHub.
Watch our YouTube Channel.

