by Samuel Kontriš | Subscribe to our newsletter!
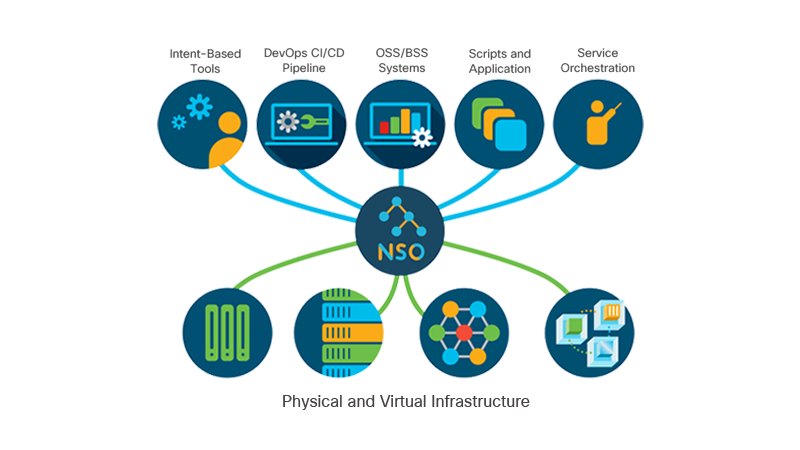
A network can get messy. That is why many service providers require a Network Orchestrator, to fill the gap between managing hundreds of devices & corresponding services like SNMP, NETCONF, REST and others. This is where Cisco’s Network Services Orchestrator comes into play and translates service orders to various network devices in your network.
The second part of our NSO Guide focuses on connecting the NSO with our SDN framework, lighty.io!
What is Cisco NSO?
An NSO serves as a translator. It breaks up high-level service layers, from management & resource layers – connecting various network functions, which may run in a virtualized or hardware environment. It defines how these network functions interact with other infrastructures and technologies within the network.
The third part of our NSO Guide focuses on Cisco NSO x ONAP SDN-C!
We have introduced Ansible & AWX for automation in the past. Since we also enjoy innovation, we decided to create this guide on installing Cisco NSO, and it’s usage with lighty.io & ONAP (SDN-C).
Contact us for a custom solution!
Installing the Network Service Orchestrator
Get & install the Cisco NSO
The installation package can be downloaded from the official Cisco developer website. This guide contains steps on how to install the Cisco NSO. We will use the NSO 5.1.0.1 version in this tutorial. This tutorial was tested on Ubuntu 18.04 LTS.
Don’t forget to set NCS_DIR variable and source ncsrc file!
export NCS_DIR=<path_to_NSO_directory>
source $NCS_DIR/ncsrc
Create a Cisco NSO project & run simulated devices
At first, create a directory where the Cisco NSO instance will be started. We will use a nso-run folder in our home directory.
mkdir ~/nso-run
cd ~/nso-run
We will create and start a network with three simulated cisco-ios-cli-3 devices with IDs c0, c1, and c2.
ncs-netsim create-network $NCS_DIR/packages/neds/cisco-ios-cli-3.0 3 c
ncs-netsim start
ncs-setup --netsim-dir ./netsim --dest .
ncs
ncs_cli -u admin
Connect and sync-from simulated devices in CLI:
request devices connect
request devices sync-from
In the output, you should see connect-result and sync-result from all three devices.
To leave CLI, press CTRL+D.
Create Cisco NSO Service
Go to the packages directory and use ncs-make-package command:
cd packages
ncs-make-package --service-skeleton template acl-service --augment /ncs:services
This will create the directory acl-service with a structure containing templates and default YANG models. Templates are used for applying configurations to devices. With the YANG file, we can model how our service can be activated and what parameters it uses.
Now, open the template XML file acl-service/templates/acl-service-template.xml and replace its content with:
<config-template xmlns="http://tail-f.com/ns/config/1.0" servicepoint="acl-service">
   <devices xmlns="http://tail-f.com/ns/ncs">
     <device foreach="{/devices}">
            <name>{device_name}</name>
            <config>
               <interface xmlns="urn:ios" foreach="{interfaces}" >
                  <FastEthernet when="{interface_type='FastEthernet'}">
                     <name>{interface_number}</name>
                     <ip>
                        <access-group tags="merge">
                           <direction>{/ACL_Direction}</direction>
                           <access-list>{/ACL_Name}</access-list>
                        </access-group>
                     </ip>
                  </FastEthernet>
                  <GigabitEthernet when="{interface_type='GigabitEthernet'}">
                     <name>{interface_number}</name>
                     <ip>
                        <access-group tags="merge">
                           <direction>{/ACL_Direction}</direction>
                           <access-list>{/ACL_Name}</access-list>
                        </access-group>
                     </ip>
                  </GigabitEthernet>

                  <TenGigabitEthernet when="{interface_type='TenGigabitEthernet'}">
                     <name>{interface_number}</name>
                     <ip>
                        <access-group tags="merge">
                           <direction>{/ACL_Direction}</direction>
                           <access-list>{/ACL_Name}</access-list>
                        </access-group>
                    </ip>
                  </TenGigabitEthernet>

              </interface>
            </config>
        </device>
    </devices>
</config-template>
This template will be used for configuring selected devices. It will add access-group with specified interface_type, interface_number, ACL_Name and ACL_Direction variables to their configuration.
The values of the mentioned variables will be set when we will activate this service. These variables are modeled in the YANG file, which we are going to update now.
Replace the content of the acl-service/src/yang/acl-service.yang file with:
module acl-service {
  namespace "http://com/example/aclservice";
  prefix acl-service;

  import ietf-inet-types {
    prefix inet;
  }
  import tailf-ncs {
    prefix ncs;
  }

  augment /ncs:services {
  list acl-service {
    key ACL_Name;

      uses ncs:service-data;
      ncs:servicepoint "acl-service";

    leaf ACL_Name {
      type string;
    }

    leaf ACL_Direction {
      type enumeration{
        enum "in";
        enum "out";
      }
    }

    list devices {
      key device_name;

      leaf device_name {
        type leafref {
          path "/ncs:devices/ncs:device/ncs:name";
        }
      }
      list interfaces {
        key "interface_type interface_number";

        leaf interface_type {
          type enumeration{
            enum "FastEthernet";
            enum "GigabitEthernet";
            enum "TenGigEthernet";
          }
        }

        leaf interface_number {
          type string;
        }
      }
    }
   }
  }
}
This YANG file model defines, what input/output parameters for the service (and devices) should be configured.
After changing the YANG file, call the make command in the src folder of your package:
cd ~/nso-run/packages/acl-service/src
make
You should see an output similar to this:
samuel@samuel-VirtualBox:~/nso-run/packages/acl-service/src$ make
mkdir -p ../load-dir
/home/samuel/nso-5.1/bin/ncsc `ls acl-service-ann.yang > /dev/null 2>&1 && echo "-a acl-service-ann.yang"` \
-c -o ../load-dir/acl-service.fxs yang/acl-service.yang
And now log into the Cisco NSO CLI and reload the packages:
ncs_cli -C -u admin
packages reload
The output should look similar to this:
admin@ncs# packages reload

>>> System upgrade is starting.
>>> Sessions in configure mode must exit to operational mode.
>>> No configuration changes can be performed until upgrade has completed.
>>> System upgrade has completed successfully.
reload-result {
    package acl-service
    result true
}
reload-result {
    package cisco-ios-cli-3.0
    result true
}
Now a Cisco NSO instance with three simulated devices should be up and running!
Turn off and clean Cisco NSO
Later when you will want to stop and clean what you started, call these commands in your project directory:
cd ~/nso-run
ncs-netsim stop
ncs --stop
ncs-netsim reset
ncs-setup --reset
ncs-netsim delete-network
Now you can continue to our next tutorial about using the Cisco NSO with lighty.io or with the ONAP (SDNC).
Leave us your feedback on this post!
9/22/2020 Update: We added our video-guide to this article, enjoy!
You can contact us at https://pantheon.tech/
Explore our Pantheon GitHub.
Watch our YouTube Channel.


![[What Is] VLAN & VXLAN](https://pantheon.tech/wp-content/uploads/2025/04/vxlan-vpp-thumb-400x250.png)
![[What Is] Whitebox Networking?](https://pantheon.tech/wp-content/uploads/2025/03/whitebox-net-thumb-400x250.png)
![[What Is] BGP EVPN?](https://pantheon.tech/wp-content/uploads/2025/03/bgp-evpn-thumb-400x250.png)