lighty.io 9.2.x provides examples of OVSDB & OpenFlow SDN controllers for integration with your SDN solution. Those examples will guide you through lighty.io controller core initialization, with OVSDB and/or OpenFlow southbound plugins attached. You can use those management protocols with a really small memory footprint and simple runtime packaging.
Today, we will show you how to run and integrate the OpenFlow plugin in lighty.
What is OpenFlow?
OpenFlow (OF) is a communications protocol, that gives access to the forwarding plane of a network switch or router over the network. OpenFlow can be applied for:
Why do we need OpenFlow?
Routers and switches can achieve various (limited) levels of user programmability. However, engineers and managers need more than the limited functionality of this hardware. OpenFlow achieves consistent traffic management and engineering exactly for these needs. This is achieved by controlling the functions independently of the hardware used.
PANTHEON.tech has managed to implement the OpenFlow plugin in lighty-core. Today, we will show you how you can run the plugin yourself.
Prerequisites
In order to build and install lighty-core artifacts locally, follow the procedure below:
- Install JDK – make sure JDK 8 is installed
- Install maven – make sure you have Maven 3.5.0 or later installed
- Setup maven – make sure you have proper settings.xml in your
~/.m2directory - Download/clone lighty-core
- (Optional) Download/clone the OpenFlow Manager App
Build and Run OpenFlow plugin example
1. Download the lighty-core repository:
git clone https://github.com/PANTHEONtechlighty-core.git
2. Checkout lighty-core version 9.2.x:
git checkout 9.2.x
3. Build the lighty-core project with the maven command:
mvn clean install
This will download all important dependencies and create .zip archive in ‘lighty-examples/lighty-community-restconf-ofp-app’ directory.
Extract this archive and start ‘start-ofp.sh’ script or run .jar file using Java 8 with the command:
java -jar lighty-community-restconf-ofp-app-9.2.1-SNAPSHOT.jar
Use custom config files
The previous command will run the application with default configuration. In order to run it with a custom configuration, edit (or create new) JSON configuration file. Example of JSON configuration can be found in lighty-community-restconf-ofp-app-9.2.1-SNAPSHOT folder.
With the previous command to start the application, pass the path to the configuration file as an argument:
java -jar lighty-community-restconf-ofp-app-9.2.1-SNAPSHOT.jar sampleConfigSingleNode.json
OpenFlow plugin and RESTCONF Configuration
An important configuration, which decides what can be changed, is stored in sampleConfigSingleNode.json. For applying all changes, we need to start OFP with this configuration as a Java parameter.
ForwardingRulesManager
FLOWs can be added to OpenFlow Plugin (OFP) in two ways:
- Sending FLOW to config data-store. ForwardingRulesManager (FRM) is listening to the config-data store. When it’s changed. the config data store FRM will sync changes on the connected device, once available.
Flow added this way is persistent. - Sending a RPC message directly to device. This option works without FRM. When is device restarted, then this the configuration will disappear.
In case you need to disable FRM, start OFP with an external configuration & set the enableForwardingRulesManager to false. Then, simply start OFP with this external configuration.
RESTCONF
RESTCONF configuration can be changed in the JSON config file sampleConfigSingleNode.json, mentioned above. It is possible to change the RESTCONF port, IP address or version of RESTCONF. Currently, the version of RESTCONF set to DRAFT_18, but it can be set to DRAFT_02.
"restconf": {
    "httpPort": 8888,
    "restconfServletContextPath": "/restconf",
    "inetAddress": "0.0.0.0",
    "jsonRestconfServiceType": "DRAFT_18"
  },
How to start the OpenFlow example
Firstly, start the OpenFlow example application.
Make sure to read through this guide on how to install mininet.
Next step is to start mininet, with at least one Open vSwitch (use version 2.2.0 and higher).
sudo mn --controller=remote,ip=<IP_OF_RUNNING_LIGHTY> --topo=tree,1 --switch ovsk,protocols=OpenFlow13
For this explanation of OFP usage, RESTCONF is set to DRAFT_18. All RESTCONF calls used in this example can be imported from file OFP_postman_collection.json, in project resources to Postman.
We will quickly check if the controller is the owner of the connected device. If not, then the controller is not running or the device is not properly connected:
curl --request GET \
  --url http://<IP_OF_RUNNING_LIGHTY>:8888/restconf/data/entity-owners:entity-owners \
  --header 'Authorization: Basic YWRtaW46YWRtaW4='
If you followed the instructions and there is a single controller running (not cluster) and only one device connected, the result is:
{
  "entity-owners": {
    "entity-type": [{
      "type": "org.opendaylight.mdsal.ServiceEntityType",
      "entity": [{
        "id": "/odl-general-entity:entity[name='openflow:1']",
        "candidate": [{
          "name": "member-1"
        }],
        "owner": "member-1"
      }]
    }, {
      "type": "org.opendaylight.mdsal.AsyncServiceCloseEntityType",
      "entity": [{
        "id": "/odl-general-entity:entity[name='openflow:1']",
        "candidate": [{
          "name": "member-1"
        }],
        "owner": "member-1"
      }]
    }]
  }
}
Let’s get information about the connected device. If you want to see all OFP inventory, use ‘get inventory‘ call from PostmanCollection.
From config:
curl -k --insecure --request GET \
  --url http:///<IP_OF_RUNNING_LIGHTY>:8888/restconf/data/opendaylight-inventory:nodes/node=openflow%3A1 \
  --header 'Authorization: Basic YWRtaW46YWRtaW4='
From operational:
curl -k --insecure --request GET \
  --url http:///<IP_OF_RUNNING_LIGHTY>:8888/restconf/data/opendaylight-inventory:nodes/node=openflow%3A1?content=nonconfig \
  --header 'Authorization: Basic YWRtaW46YWRtaW4='
JSON result starts with:
{
  "node": [{
    "id": "openflow:1",
    "node-connector": [{
      "id": "openflow:1:LOCAL",
      "flow-node-inventory:peer-features": "",
      "flow-node-inventory:advertised-features": "",
      "flow-node-inventory:port-number": 4294967294,
      "flow-node-inventory:hardware-address": "4a:15:31:79:7f:44",
      "flow-node-inventory:supported": "",
      "flow-node-inventory:current-speed": 0,
      "flow-node-inventory:current-feature": "",
      "flow-node-inventory:state": {
        "live": false,
        "link-down": true,
        "blocked": false
      },
      "flow-node-inventory:maximum-speed": 0,
      "flow-node-inventory:name": "s1",
      "flow-node-inventory:configuration": "PORT-DOWN"
    }, {
      "id": "openflow:1:2",
      "flow-node-inventory:peer-features": "",
      "flow-node-inventory:advertised-features": "",
      "flow-node-inventory:port-number": 2,
      "flow-node-inventory:hardware-address": "fa:c3:2c:97:9e:45",
      "flow-node-inventory:supported": "",
      "flow-node-inventory:current-speed": 10000000,
      "flow-node-inventory:current-feature": "ten-gb-fd copper",
      "flow-node-inventory:state": {
        "live": false,
        "link-down": false,
        "blocked": false
      },
      .
      .
      .
Add FLOW
Now try to add table-miss flow, which will modify the switch to send all not-matched-packets to the controller via packet-in messages.
To config data-store:
curl --request PUT \
  --url http://<IP_OF_RUNNING_LIGHTY>:8888/restconf/data/opendaylight-inventory:nodes/node=openflow%3A1/table=0/flow=1 \
  --header 'Authorization: Basic YWRtaW46YWRtaW4=' \
  --header 'Content-Type: application/xml' \
  --data '<?xml version="1.0" encoding="UTF-8" standalone="no"?>
<flow xmlns="urn:opendaylight:flow:inventory">
   <barrier>false</barrier>
   <cookie>54</cookie>
   <flags>SEND_FLOW_REM</flags>
   <flow-name>FooXf54</flow-name>
   <hard-timeout>0</hard-timeout>
   <id>1</id>
   <idle-timeout>0</idle-timeout>
   <installHw>false</installHw>
   <instructions>
       <instruction>
           <apply-actions>
               <action>
                   <output-action>
                       <max-length>65535</max-length>
                       <output-node-connector>CONTROLLER</output-node-connector>
                   </output-action>
                   <order>0</order>
               </action>
           </apply-actions>
           <order>0</order>
       </instruction>
   </instructions>
   <match/>
   <priority>0</priority>
   <strict>false</strict>
   <table_id>0</table_id>
</flow>'
Directly to a device via RPC call:
curl --request POST \
  --url http://<IP_OF_RUNNING_LIGHTY>:8888/restconf/operations/sal-flow:add-flow \
  --header 'Authorization: Basic YWRtaW46YWRtaW4=' \
  --header 'Content-Type: application/json' \
  --data '{
    "input": {
      "opendaylight-flow-service:node":"/opendaylight-inventory:nodes/opendaylight-inventory:node[opendaylight-inventory:id='\''openflow:1'\'']",
      "priority": 0,
      "table_id": 0,
      "instructions": {
        "instruction": [
          {
            "order": 0,
            "apply-actions": {
              "action": [
                {
                  "order": 0,
                  "output-action": {
                    "max-length": "65535",
                    "output-node-connector": "CONTROLLER"
                  }
                }
              ]
            }
          }
        ]
      },
      "match": {
      }
    }
}
Get FLOW
Check if flow is in data-store:
In the config:
curl --request GET \
  --url http://<IP_OF_RUNNING_LIGHTY>:8888/restconf/data/opendaylight-inventory:nodes/node=openflow%3A1/table=0 \
  --header 'Authorization: Basic YWRtaW46YWRtaW4='
In operational:
curl --request GET \
  --url http://<IP_OF_RUNNING_LIGHTY>:8888/restconf/data/opendaylight-inventory:nodes/node=openflow%3A1/table=0?content=nonconfig \
  --header 'Authorization: Basic YWRtaW46YWRtaW4='
Result:
{
    "flow-node-inventory:table": [
        {
            "id": 0,
            "opendaylight-flow-table-statistics:flow-table-statistics": {
                "active-flows": 1,
                "packets-looked-up": 14,
                "packets-matched": 4
            },
            "flow": [
                {
                    "id": "1",
                    "priority": 0,
                    "opendaylight-flow-statistics:flow-statistics": {
                        "packet-count": 4,
                        "byte-count": 280,
                        "duration": {
                            "nanosecond": 936000000,
                            "second": 22
                        }
                    },
                    "table_id": 0,
                    "cookie_mask": 0,
                    "hard-timeout": 0,
                    "match": {},
                    "cookie": 54,
                    "flags": "SEND_FLOW_REM",
                    "instructions": {
                        "instruction": [
                            {
                                "order": 0,
                                "apply-actions": {
                                    "action": [
                                        {
                                            "order": 0,
                                            "output-action": {
                                                "max-length": 65535,
                                                "output-node-connector": "CONTROLLER"
                                            }
                                        }
                                    ]
                                }
                            }
                        ]
                    },
                    "idle-timeout": 0
                }
            ]
        }
    ]
}
Get FLOW directly from modified device s1 in the command line:
sudo ovs-ofctl -O OpenFlow13 dump-flows s1
Device result:
cookie=0x36, duration=140.150s, table=0, n_packets=10, n_bytes=700, send_flow_rem priority=0 actions=CONTROLLER:65535
Update FLOW
This works the same as add flow. OFP will find openflow:1, table=0, flow=1 from url and update changes from the body.
Delete FLOW
From config data-store:
curl --request DELETE \
  --url http://<IP_OF_RUNNING_LIGHTY>:8888/restconf/data/opendaylight-inventory:nodes/node=openflow%3A1/table=0/flow=1 \
  --header 'Authorization: Basic YWRtaW46YWRtaW4=' \
  --header 'Content-Type: application/xml' \
  --data ''
Via RPC calls:
curl --request POST \
  --url http://<IP_OF_RUNNING_LIGHTY>:8888/restconf/operations/sal-flow:remove-flow \
  --header 'Authorization: Basic YWRtaW46YWRtaW4=' \
  --header 'Content-Type: application/json' \
  --data '{
    "input": {
      "opendaylight-flow-service:node":"/opendaylight-inventory:nodes/opendaylight-inventory:node[opendaylight-inventory:id='\''openflow:1'\'']",
      "table_id": 0
    }
}'
Proactive flow installation & traffic monitor via Packet-In messages
In order to create traffic, we need to setup topology behavior. There are three methods for flow table population (Reactive, Proactive, Hybrid). We encourage you to read more about their differences.
In our example, we use Proactive flow installation, which means that we proactively create flows before traffic started.
- Start lighty OpenFlow example lighty-community-restconf-ofp-app
- Create mininet with linear topology and 2 open vSwitches
sudo mn --controller=remote,ip=<IP_OF_RUNNING_LIGHTY>:6633 --topo=linear,2 --switch ovsk,protocols=OpenFlow13
Now we tested that connection between devices is not established:
mininet> pingall
*** Ping: testing ping reachability
h1 -> X
h2 -> X
*** Results: 100% dropped (0/2 received)
Next step is to create flows, that create a connection between switches. This will be managed by setting Matched and Action filed in Table 0. In this example, we connect two ports eth1 and eth2 in a switch together. So everything that comes from port eth1, is redirected to port eth2 and vice versa.
Next configuration will be sending monitoring packets in a network. This configuration has set the switch s1 to send all packets, which came to port eth2, to the controller. So the visualized result should look like this:
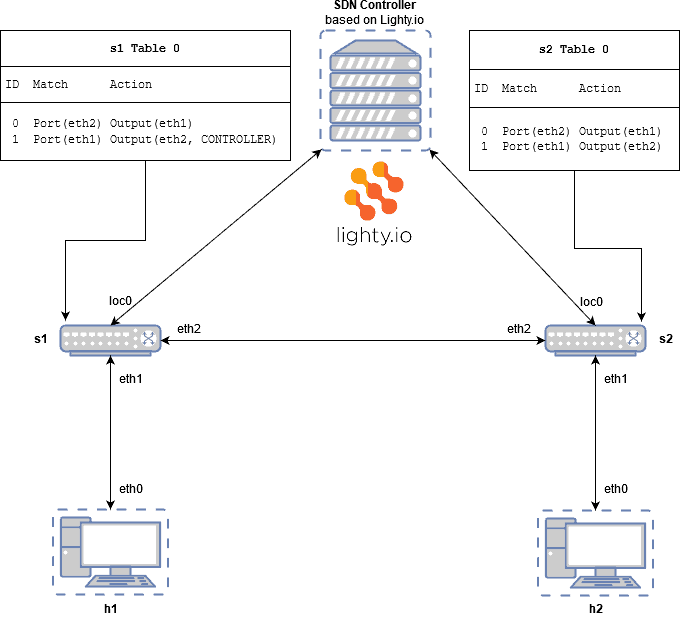
1. Add flow to switch s1 (named in OFP as ‘openflow:1’), which redirect all traffic that comes from port eth1 (in OFP named as ‘1’) to port eth2 (in OFP named as ‘2’).
curl --request PUT \
  --url http://<IP_OF_RUNNING_LIGHTY>:8888/restconf/data/opendaylight-inventory:nodes/node=openflow%3A1/table=0/flow=0 \
  --header 'Authorization: Basic YWRtaW46YWRtaW4=' \
  --header 'Content-Type: application/json' \
  --data '{
      "flow": [
          {
              "table_id": "0",
              "id": "0",
              "priority": "10",
              "match": {
                  "in-port": "openflow:1:1"
              },
              "instructions": {
                  "instruction": [
                      {
                          "order": 0,
                          "apply-actions": {
                              "action": [
                                  {
                                      "order": 0,
                                      "output-action": {
                                          "output-node-connector": "2",
                                          "max-length": "65535"
                                      }
                                  }
                              ]
                          }
                      }
                  ]
              }
          }
      ]
}'
2. Add flow to switch s1, which will connect port 2 and 1 in another direction. Set switch s1 to send all packet transmitted through port 2 to controller:
curl --request PUT \
  --url http://<IP_OF_RUNNING_LIGHTY>:8888/restconf/data/opendaylight-inventory:nodes/node=openflow%3A1/table=0/flow=1 \
  --header 'Authorization: Basic YWRtaW46YWRtaW4=' \
  --header 'Content-Type: application/json' \
  --data '{
    "flow": [
        {
            "table_id": "0",
            "id": "1",
            "priority": "10",
            "match": {
                "in-port": "openflow:1:2"
            },
            "instructions": {
                "instruction": [
                    {
                        "order": 0,
                        "apply-actions": {
                            "action": [
                                {
                                    "order": 0,
                                    "output-action": {
                                        "output-node-connector": "1",
                                        "max-length": "65535"
                                    }
                                },
                                {
                                    "order": 1,
                                    "output-action": {
                                        "output-node-connector": "CONTROLLER",
                                        "max-length": "65535"
                                    }
                                }
                            ]
                        }
                    }
                ]
            }
        }
    ]
}'
3. Check all added flows at s1 switch:
{
    "flow-node-inventory:table": [
        {
            "id": 0,
            "opendaylight-flow-table-statistics:flow-table-statistics": {
                "active-flows": 1,
                "packets-looked-up": 317,
                "packets-matched": 273
            },
            "flow": [
                {
                    "id": "1",
                    "priority": 10,
                    "opendaylight-flow-statistics:flow-statistics": {
                        "packet-count": 0,
                        "byte-count": 0,
                        "duration": {
                            "nanosecond": 230000000,
                            "second": 5
                        }
                    },
                    "table_id": 0,
                    "cookie_mask": 0,
                    "hard-timeout": 0,
                    "match": {
                        "in-port": "openflow:1:2"
                    },
                    "cookie": 0,
                    "flags": "",
                    "instructions": {
                        "instruction": [
                            {
                                "order": 0,
                                "apply-actions": {
                                    "action": [
                                        {
                                            "order": 0,
                                            "output-action": {
                                                "max-length": 65535,
                                                "output-node-connector": "1"
                                            }
                                        },
                                        {
                                            "order": 1,
                                            "output-action": {
                                                "max-length": 65535,
                                                "output-node-connector": "CONTROLLER"
                                            }
                                        }
                                    ]
                                }
                            }
                        ]
                    },
                    "idle-timeout": 0
                }
            ]
        }
    ]
}
4. Add flow to switch s2 to connect port 1 and 2:
curl --request PUT \
  --url http://<IP_OF_RUNNING_LIGHTY>:8888/restconf/data/opendaylight-inventory:nodes/node=openflow%3A2/table=0/flow=0 \
  --header 'Authorization: Basic YWRtaW46YWRtaW4=' \
  --header 'Content-Type: application/json' \
  --data '{
    "flow": [
        {
            "table_id": "0",
            "id": "0",
            "priority": "10",
            "match": {
                "in-port": "openflow:2:1"
            },
            "instructions": {
                "instruction": [
                    {
                        "order": 0,
                        "apply-actions": {
                            "action": [
                                {
                                    "order": 0,
                                    "output-action": {
                                        "output-node-connector": "2",
                                        "max-length": "65535"
                                    }
                                }
                            ]
                        }
                    }
                ]
            }
        }
    ]
}'
5. Check all added flow at s2 switch:
{
    "flow-node-inventory:table": [
        {
            "id": 0,
            "opendaylight-flow-table-statistics:flow-table-statistics": {
                "active-flows": 2,
                "packets-looked-up": 294,
                "packets-matched": 274
            },
            "flow": [
                {
                    "id": "0",
                    "priority": 10,
                    "opendaylight-flow-statistics:flow-statistics": {
                        "packet-count": 0,
                        "byte-count": 0,
                        "duration": {
                            "nanosecond": 388000000,
                            "second": 7
                        }
                    },
                    "table_id": 0,
                    "cookie_mask": 0,
                    "hard-timeout": 0,
                    "match": {
                        "in-port": "openflow:2:1"
                    },
                    "cookie": 0,
                    "flags": "",
                    "instructions": {
                        "instruction": [
                            {
                                "order": 0,
                                "apply-actions": {
                                    "action": [
                                        {
                                            "order": 0,
                                            "output-action": {
                                                "max-length": 65535,
                                                "output-node-connector": "2"
                                            }
                                        }
                                    ]
                                }
                            }
                        ]
                    },
                    "idle-timeout": 0
                },
                {
                    "id": "1",
                    "priority": 10,
                    "opendaylight-flow-statistics:flow-statistics": {
                        "packet-count": 0,
                        "byte-count": 0,
                        "duration": {
                            "nanosecond": 98000000,
                            "second": 3
                        }
                    },
                    "table_id": 0,
                    "cookie_mask": 0,
                    "hard-timeout": 0,
                    "match": {
                        "in-port": "openflow:2:2"
                    },
                    "cookie": 0,
                    "flags": "",
                    "instructions": {
                        "instruction": [
                            {
                                "order": 0,
                                "apply-actions": {
                                    "action": [
                                        {
                                            "order": 0,
                                            "output-action": {
                                                "max-length": 65535,
                                                "output-node-connector": "1"
                                            }
                                        }
                                    ]
                                }
                            }
                        ]
                    },
                    "idle-timeout": 0
                }
            ]
        }
    ]
}
Now, when we try to ping all devices in mininet, we will receive positive feedback:
mininet> pingall
*** Ping: testing ping reachability
h1 -> h2
h2 -> h1
*** Results: 0% dropped (2/2 received)
Show Packet-In messages with Wireshark
Wireshark is a popular network protocol analyzer. It lets you analyze everything that is happening in your network and is a necessity for network administrators and power-users alike.
Start Wireshark with the command:
sudo wireshark
After it starts, double click on ‘any’ filter. Then, filter packets with ‘openflow_v4.type == 10‘. Now, the Wireshark environment setup will only show Packet-In messages from OpenFlow protocol.
To create traffic in mininet network, we used mininet command:
h2 ping h1
If everything is setup correctly, then we can see Packet-In messages showing up.
Show Packet-In messages with PacketInListener
In the below section for Java developers, there is an option for setting Packet-In Listener. This configuration set to log every Packet-In message as a TRACE log to console. When this is done, run mininet command ‘h2 ping h1’ again.
If everything is set up correctly, then we can see Packet-In messages in logs.
Java DevelopersSome configuration can be done in Java Main class from OpenFlow Protocol example.
Packet-in listener
Packet handling is managed by adding a Packet Listener. In our example, we add the PacketInListener class, which will be logging packet-in messages. For a new packet listener class, it is important to have implemented the class “PacketProcessingListener”.
The first step is to create an instance of PacketInListener (1 – in the window below). Then we will add OpenflowSouthboundPluginBuilder to this part of the code (2 – in the window below).
//3. start openflow SBP
     PacketProcessingListener packetInListener = new PacketInListener();           (1)
     final OpenflowSouthboundPlugin plugin;
     plugin = new OpenflowSouthboundPluginBuilder()
             .from(configuration, lightyController.getServices())
             .withPacketListener(packetInListener)                                 (2)
             .build();
     ListenableFuture<Boolean> start = plugin.start();
OpenFlow Manager (OFM) App
OpenFlow Manager (OFM) is an application developed to run on top of ODL/Lighty to visualize OpenFlow (OF) topologies, program OF paths, gather OF stats and for managing flow tables. In order to install the OFM App, follow these steps:
1. Download OFM repositories from GitHub and checkout master branch
git clone https://github.com/PANTHEONtechOpenDaylight-Openflow-App.git
git checkout master
2. NGINX installation
NGINX is used to serve as a proxy server towards OFM application and ODL/lighty RESTCONF interface. Before NGINX starts, it is important to the switch NGINX config file in /etc/nginx/sites-enabled/ with the default file in the root of this project.
In this default file, we have set up the NGINX port, port for RESTCONF and Grunt port. Please be sure that these ports are correct.
After replacing the config file, start NGINX with the command:
sudo apt install nginx
If you need to stop NGINX, type in the command:
sudo systemctl stop nginx
3. OFM configuration
Before running the OFM standalone application, it is important to configure:
- The controller base URL
- NGINX port
- ODL username and ODL/lighty password
All this information should be written in env.module.js file located in the directory ofm src/common/config.
4. Grunt installation
To run OFM standalone app on local web server, you can use tool Grunt. For this tool is everything prepared in the OFM repository. Grunt is installable via npm, the Node.js package manager.After running grunt and NGINX you can access OFM standalone app via web browser on used NGINX port typing URL localhost:9000.
After running Grunt and NGINX, you can access OFM standalone app via a web browser on a used NGINX port by typing the URL localhost:9000.
OpenFlow Manager environment
With OFM, we can also start the Lighty-OpenFlow Southbound plugin example. From lighty-core repository, follow the example above. In this example, we will use mininet to simulate network topology, start with the command:
sudo mn --controller=remote,ip=<IP_OF_RUNNING_LIGHTY>:6633 --topo=linear,2 --switch ovsk,protocols=OpenFlow13
If everything is set up correctly, then you should see a basic view of the network topology:

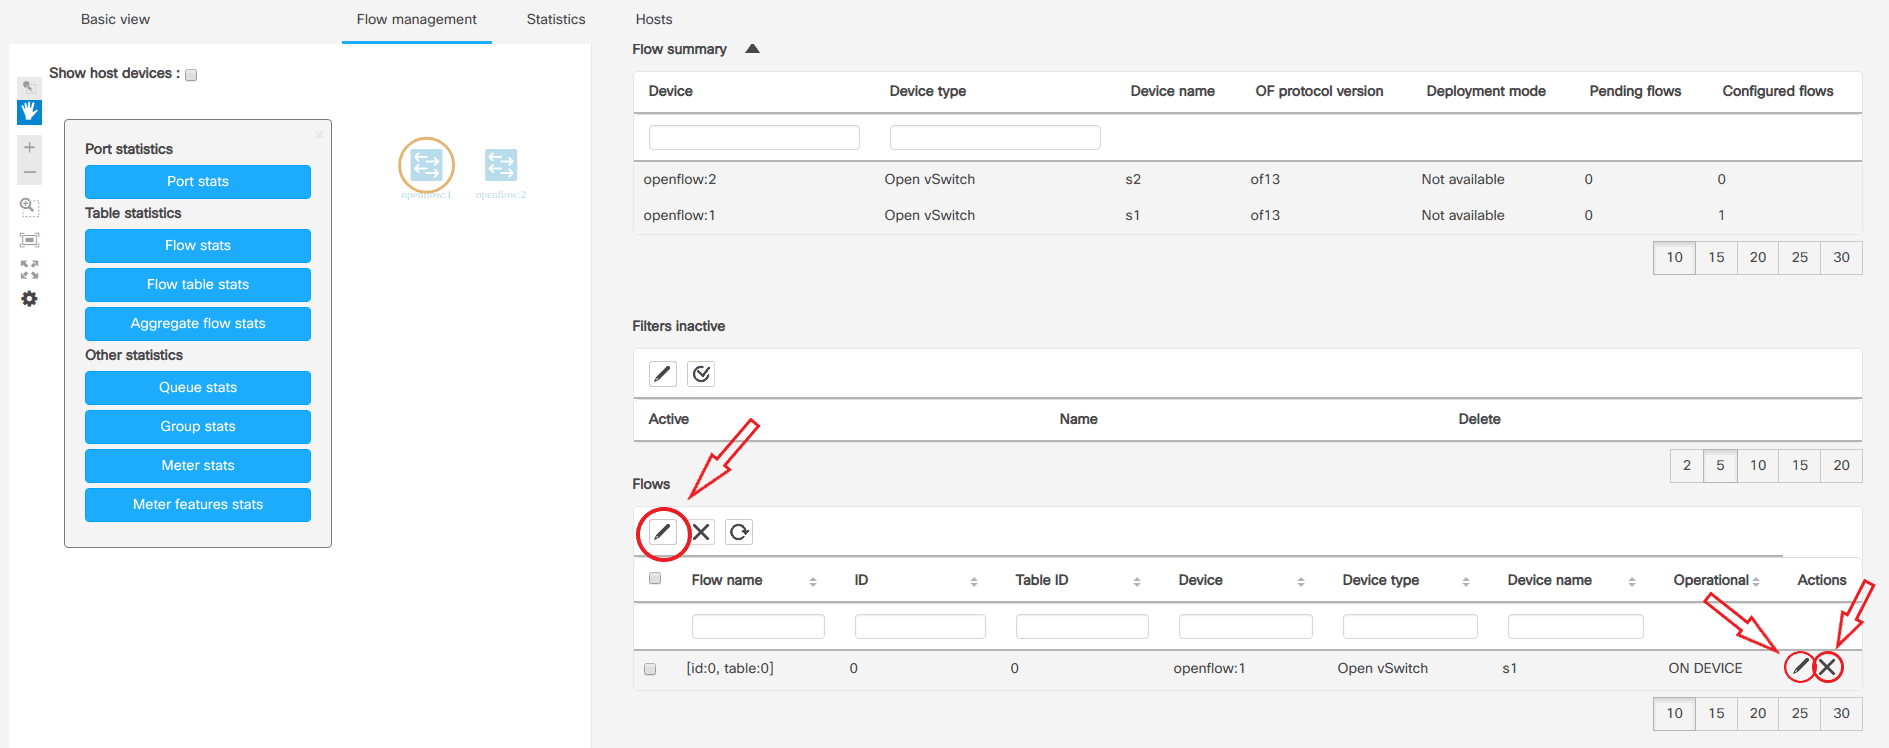
Device management
To see detailed device information, select those devices that you want to inspect. Then click on the main menu bar, at the top of “Flow management” section. Now, you should see device information and added Flows.
In a Flow section, you can Add Flow by clicking on the pen on the left-top side of the table marked by an arrow. In the right side of table at each row, you can delete or update selected flow.
Adding Flows
Adding a flow can be done from the Flow management section by clicking on the pen, on the left-top side of Flow table. Here you can choose the switch, from where the flow should be sent. Then just click on the property that should be added in the flow, from the left menu.
After filling all required fields, you can view your flow as a JSON message, by clicking on the “show preview” button. For sending flows to a switch, click on “Send message” button.

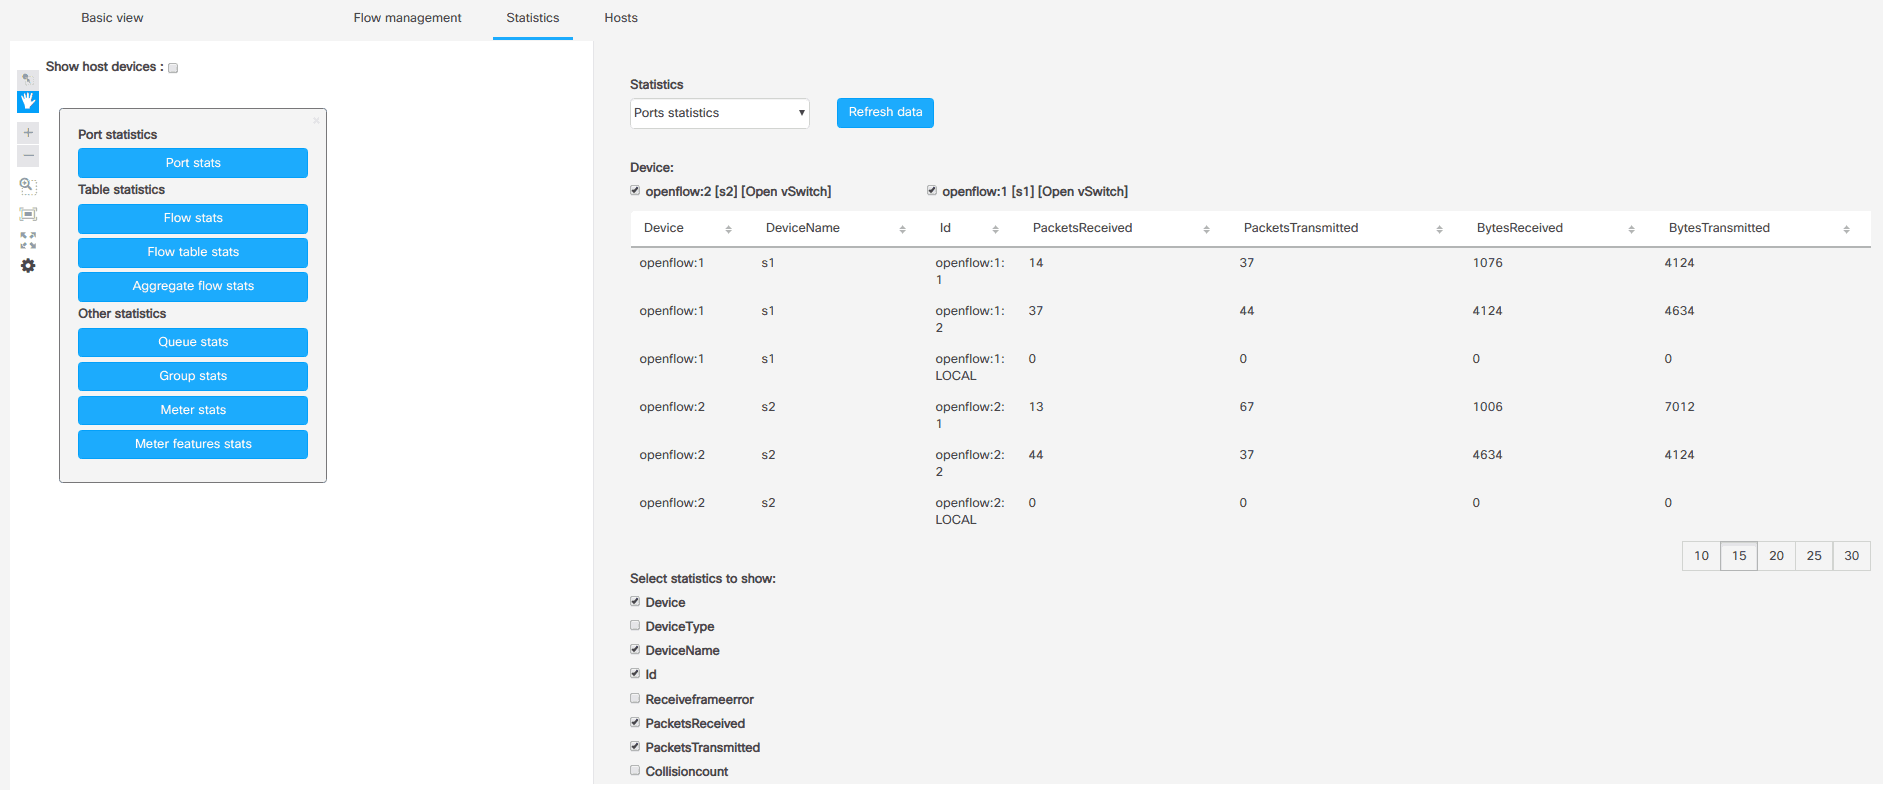
Statistics
To show statistics in the network click on the “Statistics” section in the main menu bar. Then, choose from the drop-down menu what statistic you want to see and click on “Refresh data” button.
Conclusion
We have managed to integrate the whole OpenFlow plugin into lighty-core. This is the same way it is implemented in OpenDaylight, version Fluorine (SR1). It is, therefore, possible to use lighty-controller for managing network devices via the OpenFlow protocol.
If you would like to see how our commercial version might benefit your business, please visit lighty.io for more information, or contact us here.

![[How-To] Evaluate an Enterprise Network Orchestration & Automation Platform](https://pantheontech1.b-cdn.net/wp-content/uploads/2026/05/evaluate-orch-platform.jpg)