[Hands-On] Network Automation with ServiceNow® & OpenDaylight

13/05/2020

by Miroslav Kováč | Leave us your feedback on this post!

PANTHEON.tech s.r.o., its products or services, are not affiliated with ServiceNow®, neither is this post an advertisement of ServiceNow® or its products.

ServiceNow® is a complex cloud application, used to manage companies, their employees, and customers. It was designed to help you automate the IT aspects of your business – service, operations, and business management. It creates incidents where using flows, you can automate part of the work that is very often done manually. All this can be easily set up by any person, even if you are not a developer.

An Example

If a new employee is hired in the company, he will need access to several things, based on his position. An incident will be created in ServiceNow® by HR. This will trigger a pre-created, generic flow, which might, for example, notify his direct supervisor (probably manager) and he would be asked to approve this request of access.

Once approved, the flow may continue and set everything up for this employee. It may notify the network engineer, to provision the required network services like (VPN, static IPs, firewall rules, and more), in order to give a new employee a computer. Once done, he will just update the status of this task to done, which may trigger another action. It can automatically give him access to the company intranet. Once everything is done, it will notify everyone it needs to, about a successful job done, with an email or any other communication resource the company is using.
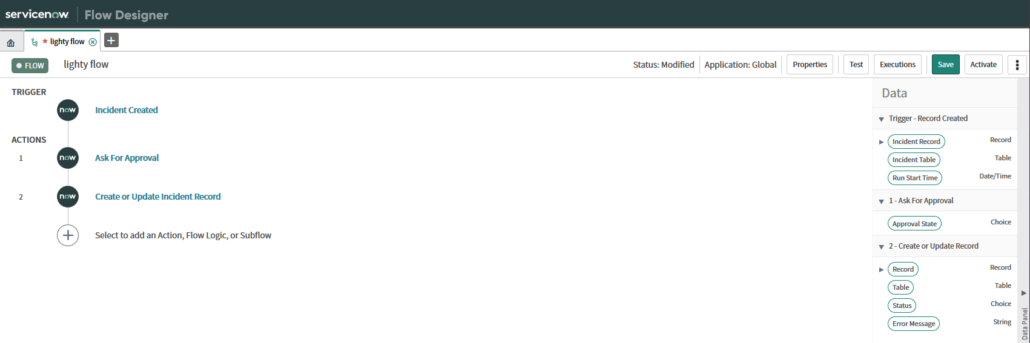
Showing the ServiceNow® Flow Designer


Setting Up the Flow

Let’s take it a step further, and try to replace the network engineer, who has to manually configure the services needed for the device.

In a simple environment with a few network devices, we could set up the ServiceNow® Workflow, so that it can access them directly and edit the configuration, according to the required parameters.

In a complex, multi-tenant environment we could leverage a network controller, that can serve the required service and maintain the configuration of several devices. This will make the required service functional. In that case, we will need ServiceNow® to communicate with the controller, which secures this required network service.

The ServiceNow® orchestration understands and reads REST, OpenDaylight & lighty.io – in our case, the controller. It provides us with the RESTCONF interface, with which we can easily integrate ServiceNow®, OpenDaylight, or lighty.io, thanks to the support of both these technologies.

Now, we look at how to simplify this integration. For this purpose, we used OpenAPI.

This is one of the features, thanks to which we can generate a JSON according to the OpenAPI specification for every OpenDaylight/lighty.io application with RESTCONF, which we can then import into ServiceNow®.

If your question is, whether it is possible to integrate a network controller, for example, OpenDaylight or lighty.io, the answer is yes. Yes, it is.

Example of Network Automation

Let’s say we have an application with a UI, that will let us manage the network with a control station. We want to connect a new device to it and set up its interfaces. Manually, you would have to make sure that the device is running. If not, we have to contact IT support to plug it in, create a request to connect to it. Once done, we have to create another request to set up the interfaces and verify the setup.

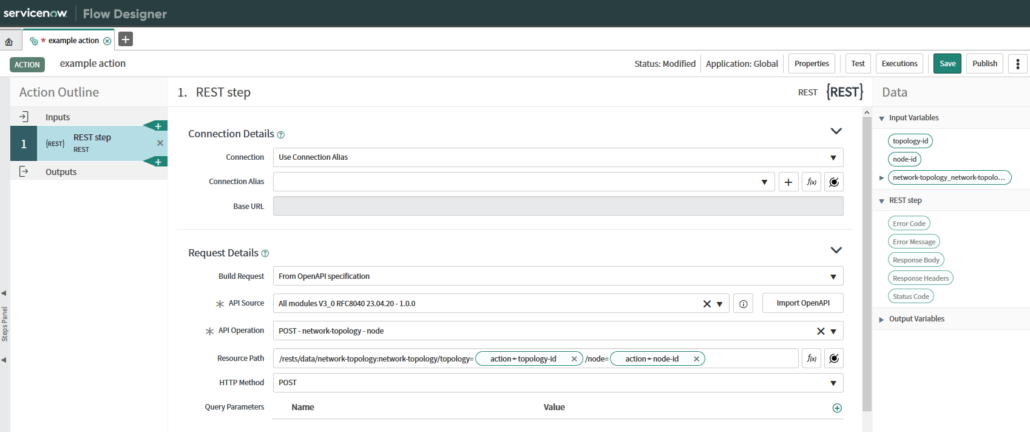
Using flows in ServiceNow® will let you do all that automatically. All your application needs to do, is create an incident in ServiceNow ®. This incident would be set up as a trigger, for a flow to start. It would try to create a connection using a REST request, that would be chosen from API operations, which we have from our OpenAPI JSON. This was automatically generated from YANG files, that are used in the project.

If a connection fails, then it would automatically send an email to IT support, creating a new, separate incident, that would have to be marked as done before this flow can continue. Once done, we can try to connect again using the same REST. When the connection is successful, we can choose a new API operation again, that would process the interfaces.

After that, we can choose another API operation that would get all the created settings and send that to the person, that created this incident using an email and mark this incident as done.

OpenAPI & oneOf

Showing the ServiceNow® API Operation

Since the “New York” release of ServiceNow®, the import of OpenAPI is a new feature, it has some limitations.

During usage, we noticed a few inconsistencies, which we would like to share with you. Here are some tips, what you should look out for when using this feature.

OpenAPI & ServiceNow®

OpenAPI supports the oneOf feature, which is something that is needed for choice keywords in YANG. You can choose, which nodes you want to use. Currently, the workaround for this is to use the Swagger 2.0 implementation, which does not support the oneOf feature and will list all the cases that exist in a choice statement. If you go to input variables, you may delete any input variables that you don’t want yourself.

JSONs & identical item names

Another issue is when we have a JSON that contains the same item names in different objects or levels. So if I need the following JSON:

{
    "username": "foo",
    "password": "bar":,
    "another-log-in": {
        "username": "foo",
        "password": "bar"
    }
}

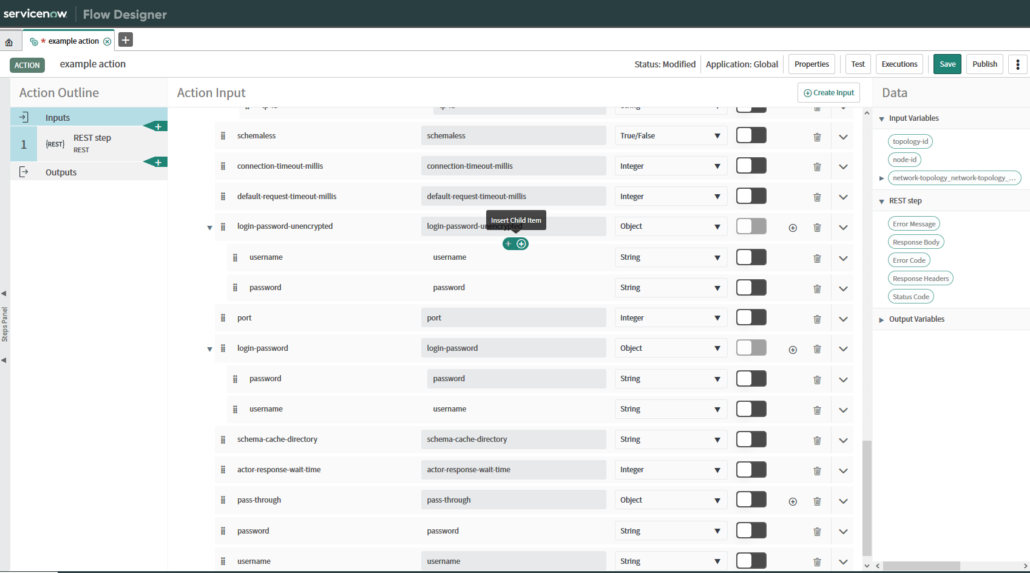
The workaround is, to add other input variables manually, that will have the same name, like the one that is missing. Suddenly, it may appear twice in input variables, but during testing, it appears only once – where it’s supposed to. Therefore, you need to manually fill in all the missing variables using the “+” button in the input variables tab.we have the username and password twice. However, it would appear in the input variables just once. When testing the action, I was unable to fill it in like the above JSON.

showing the ServiceNow® inputs

Input Variables in ServiceNow®

The last issue that we have, is with ServiceNow® not requiring input variables. Imagine you create an action with REST Step. If there are some variables that you don’t need to set up, you would normally not assign any value to that variable and it would not be set.

Here, it would automatically set it to a default value or an empty string if there is no default value, which can cause some problems with decimals as well – since you should not put strings into a decimal variable.

Again, the workaround is to remove all the input variables, that you are not going to use.

This concludes our network automation with the ServiceNow guide. Leave us your feedback on this post!


You can contact us at https://pantheon.tech/

Explore our Pantheon GitHub.

Watch our YouTube Channel.

Network management tooling has a habit of lagging behind the hardware it is supposed to control.

You upgrade your switches to 400G, your AI training cluster generates telemetry at a rate SNMP was never designed to handle, and you are still polling every 60 seconds, waiting for a response. gNMI (gRPC Network Management Interface) fixes this. PANTHEON.tech contributed a native gNMI plugin to OpenDaylight, and you can now wire it into Java applications.

This guide covers the architecture, the code, and a full walkthrough for running the controller against a local gNMI device simulator.

Why gNMI belongs in your stack

gNMI runs on gRPC, which means HTTP/2 and Protocol Buffers. Three properties make it worth the migration:

Binary framing over Protobuf eliminates NETCONF's XML verbosity, cutting payload size and CPU cost at both ends.

Streaming telemetry via the Subscribe RPC shifts the model from polling to push: the device sends state the moment something changes. Three modes exist: STREAM for continuous high-frequency data, ON_CHANGE for event-driven notifications (a link going down, a buffer overflowing), and SAMPLE for periodic snapshots.

Atomic Set operations make configuration changes transactional: either the entire config applies, or none of it does, eliminating the partial-state failures that break SNMP-based automation.

In AI training clusters, a buffer overflow during a training run costs hours of compute. A polling interval of 60 seconds means the problem sits undetected.

The OpenDaylight gNMI Plugin

PANTHEON.tech, as the largest contributor to OpenDaylight's codebase, built and upstreamed the gNMI plugin to the opendaylight/gnmi repository. The plugin provides:

  • gNMI Southbound: a gRPC client that manages connections to gNMI-capable devices and handles Capabilities, Get, and Set RPCs.
  • RESTCONF Northbound: all gNMI operations are exposed via standard RESTCONF over HTTP/JSON, so your automation tooling does not need to speak gRPC.
  • MD-SAL integration: the plugin translates the binary gRPC world into OpenDaylight's Model-Driven Service Abstraction Layer, making device data available as YANG-modelled datastore entries.

The canonical deployment vehicle for the plugin is the lighty-rcgnmi-app, which this guide uses throughout.

Solving the Karaf problem with lighty.io

Standard OpenDaylight ships as an Apache Karaf OSGi container. Karaf is powerful, but carries a real operational cost: startup can take several minutes, memory use is high, and dependency resolution degrades as the module count grows.

lighty.io is an SDK that runs ODLs core components (MD-SAL, YANG Tools, the global schema context) in a plain Java SE environment, without an OSGi container. Startup drops from minutes to seconds. The memory footprint shrinks enough to fit Kubernetes deployments and microservice architectures comfortably.

To use the gNMI plugin inside Karaf, the opendaylight/gnmi repository ships a runnable Karaf distribution. For microservices, containers, or fast local iteration, use lighty.io.

Architecture overview

                ┌────────────────────────────────────────────┐
                │           lighty-rcgnmi-app (JVM)          │
                │                                            │
                │  ┌───────────────┐   ┌──────────────────┐  │
HTTP/JSON  ───► │  │   RESTCONF    │──►│  lighty.io       │  │
                │  │   Northbound  │   │  Controller      │  │
                │  └───────────────┘   │  (MD-SAL, YANG)  │  │
                │                      └────────┬─────────┘  │
                │                               │            │
                │                      ┌────────▼─────────┐  │
                │                      │  gNMI Southbound │  │
                │                      │  (gRPC client)   │  │
                └──────────────────────┴────────┬─────────┴──┘  
                                                │ gRPC/TLS
                                       ┌────────▼─────────┐
                                       │  gNMI Device     │
                                       │  (router/switch/ │
                                       │   simulator)     │
                                       └──────────────────┘

RESTCONF requests arrive at the northbound, traverse MD-SAL, and the southbound plugin translates them to gNMI GetRequest or SetRequest. Device data flows back the same path in reverse.

Prerequisites

  • Java 21 or later
  • Maven 3.9.5 or later
  • curl (or Postman/Bruno)
  • Linux-based system (for the bash commands in the simulator setup)

Building the RCgNMI application

Clone the lighty repository and build the full project. The initial build downloads the ODL artifact set, so expect a few minutes on first run.

git clone https://github.com/PANTHEONtech/lighty.git
cd lighty
mvn clean install

To build only the RCgNMI application and its dependencies, use the partial build flag:

mvn clean install -pl lighty-applications/lighty-rcgnmi-app-aggregator/lighty-rcgnmi-app -am

The build produces a self-contained .zip distribution at:

lighty-applications/lighty-rcgnmi-app-aggregator/lighty-rcgnmi-app/target/lighty-rcgnmi-app-<version>-bin.zip

Running the test application with the nuilt-in simulator

The fastest way to validate the setup is to run the RCgNMI controller alongside the bundled gNMI device simulator. The simulator starts with pre-configured OpenConfig state and config data, and communicates over TLS.

Step 1 - Start the RCgNMI Controller

cd lighty-examples/lighty-gnmi-community-restconf-app

# Unzip the controller
unzip ../../lighty-applications/lighty-rcgnmi-app-aggregator/lighty-rcgnmi-app/target/lighty-rcgnmi-app-24.0.0-SNAPSHOT-bin.zip

# Start with the pre-prepared example config
java -jar lighty-rcgnmi-app-24.0.0-SNAPSHOT/lighty-rcgnmi-app-24.0.0-SNAPSHOT.jar -c example_config.json

A successful start prints a log line like:

INFO [main] (RCgNMIApp.java:98) - RCgNMI lighty.io application started in 10.10 s

The RESTCONF API listens on port 8888. Default credentials are admin / admin.

Step 2 - Start the gNMI device simulator

Open a second terminal:

cd lighty-examples/lighty-gnmi-community-restconf-app

unzip ../../lighty-modules/lighty-gnmi/lighty-gnmi-device-simulator/target/lighty-gnmi-device-simulator-24.0.0-SNAPSHOT-bin.zip

java -jar lighty-gnmi-device-simulator-24.0.0-SNAPSHOT/lighty-gnmi-device-simulator-24.0.0-SNAPSHOT.jar \
  -c simulator/simulator_config.json

The simulator listens on port 10161.

Step 3 - Add TLS certificates to the keystore

The controller stores TLS credentials in MD-SAL, keyed by a keystore-id. Load the example certificates bundled with the use-case:

curl --request POST 'http://127.0.0.1:8888/restconf/operations/gnmi-certificate-storage:add-keystore-certificate' \
  --header 'Content-Type: application/json' \
  --data-raw "{
      \"input\": {
          \"keystore-id\": \"keystore-id-1\",
          \"ca-certificate\": \"$(cat certificates/ca.crt)\",
          \"client-key\": \"$(cat certificates/client.key)\",
          \"client-cert\": \"$(cat certificates/client.crt)\"
      }
  }"

If your private key has a passphrase, add "passphrase": "your-passphrase" to the input. The controller encrypts the key material using ODL's AAA encryption service before storing it.

Step 4 - Connect the simulator to the controller

Add the simulator as a node in gnmi-topology:

curl --request PUT 'http://127.0.0.1:8888/restconf/data/network-topology:network-topology/topology=gnmi-topology/node=gnmi-simulator' \
  --header 'Content-Type: application/json' \
  --data-raw '{
      "node": [
          {
              "node-id": "gnmi-simulator",
              "connection-parameters": {
                  "host": "127.0.0.1",
                  "port": 10161,
                  "keystore-id": "keystore-id-1",
                  "credentials": {
                      "username": "admin",
                      "password": "admin"
                  }
              },
              "extensions-parameters": {
                  "gnmi-parameters": {
                      "use-model-name-prefix": true
                  }
              }
          }
      ]
  }'

When the mount point is established, the controller logs:

INFO [gnmi_executor-1] (GnmiMountPointRegistrator.java:52) - Mount point for node gnmi-simulator created
INFO [gnmi_executor-0] (GnmiNodeListener.java:105) - Connection with node Uri{_value=gnmi-simulator} established successfully

Step 5 - Check vonnection dtatus

curl --request GET \
  'http://127.0.0.1:8888/restconf/data/network-topology:network-topology/topology=gnmi-topology/node=gnmi-simulator'

Look for "node-status": "READY" in the response. If the connection failed, a failure-details field explains why.

CRUD Operations over RESTCONF → gNMI

Once a device's mount point is READY, RESTCONF requests targeting its path translate to gNMI operations. The mapping is:

HTTP Method gNMI Operation Notes
GET GnmiGet Returns CONFIG + STATE merged by default
PUT/POST GnmiSet (update/replace) Replaces the target resource
PATCH GnmiSet (update) Merges into the existing resource
DELETE GnmiSet (delete) Removes the target path

A GET without a content query parameter triggers two underlying gNMI requests, one CONFIG and one STATE, and the controller merges the responses. To target one explicitly, append ?content=config or ?content=nonconfig.

Reading device state

Get all interface data from the connected simulator:

curl --request GET \
  'http://127.0.0.1:8888/restconf/data/network-topology:network-topology/topology=gnmi-topology/node=gnmi-simulator/yang-ext:mount/openconfig-interfaces:interfaces'

Get authentication configuration from the config datastore:

curl --request GET \
  'http://127.0.0.1:8888/restconf/data/network-topology:network-topology/topology=gnmi-topology/node=gnmi-simulator/yang-ext:mount/openconfig-system:system/aaa/authentication?content=config'

Writing configuration

Replace the authentication config on the device:

curl --request PUT \
  'http://127.0.0.1:8888/restconf/data/network-topology:network-topology/topology=gnmi-topology/node=gnmi-simulator/yang-ext:mount/openconfig-system:system/aaa/authentication' \
  --header 'Content-Type: application/json' \
  --data-raw '{
      "openconfig-system:authentication": {
          "config": {
              "authentication-method": [
                  "openconfig-aaa-types:TACACS_ALL"
              ]
          }
      }
  }'

Patching (merging) configuration

Append a new authentication method without overwriting existing ones:

curl --request PATCH \
  'http://127.0.0.1:8888/restconf/data/network-topology:network-topology/topology=gnmi-topology/node=gnmi-simulator/yang-ext:mount/openconfig-system:system/aaa/authentication/config' \
  --header 'Content-Type: application/json' \
  --data-raw '{
      "openconfig-system:config": {
          "authentication-method": [
              "openconfig-aaa-types:RADIUS_ALL"
          ]
      }
  }'

Deleting configuration

curl --location --request DELETE \
  'http://127.0.0.1:8888/restconf/data/network-topology:network-topology/topology=gnmi-topology/node=gnmi-simulator/yang-ext:mount/openconfig-system:system/aaa/authentication/config'

Disconnecting a device

curl --request DELETE \
  'http://127.0.0.1:8888/restconf/data/network-topology:network-topology/topology=gnmi-topology/node=gnmi-simulator'

Loading YANG models for schema context

Before the gNMI southbound creates a mount point for a device, it builds a schema context: a complete picture of which YANG models the device implements. The gNMI Capabilities response provides model names and versions, but not their content. You need to supply the actual YANG files separately.

You have two options:

Option A — at startup via configuration file. Add a gnmi block to your configuration.json:

{
  "gnmi": {
    "initialYangsPaths": [
      "/path/to/yang/models/folder"
    ],
    "initialYangModels": [
      {
        "nameSpace": "http://openconfig.net/yang/interfaces",
        "name": "openconfig-interfaces",
        "revision": "2021-04-06"
      }
    ]
  }
}

Option B — at runtime via RPC. Upload a model to a running instance (escape the quotes inside the body):

curl --request POST 'http://127.0.0.1:8888/restconf/operations/gnmi-yang-storage:upload-yang-model' \
  --header 'Content-Type: application/json' \
  --data-raw '{
      "input": {
          "name": "openconfig-interfaces",
          "semver": "2.4.3",
          "body": "YANG_MODEL_CONTENT_WITH_ESCAPED_QUOTES"
      }
  }'

If a device does not report all its capabilities in the Capabilities response (a common issue with devices that use augmenting models), use force-capability in the connection request to override what the controller uses:

curl --request PUT \
  'http://127.0.0.1:8888/restconf/data/network-topology:network-topology/topology=gnmi-topology/node=my-device' \
  --header 'Content-Type: application/json' \
  --data-raw '{
      "node": [
          {
              "node-id": "my-device",
              "connection-parameters": {
                  "host": "192.168.1.100",
                  "port": 9090,
                  "connection-type": "INSECURE"
              },
              "extensions-parameters": {
                  "force-capability": [
                      {"name": "openconfig-if-ethernet", "version": "2.6.2"},
                      {"name": "openconfig-if-ip",       "version": "2.3.1"}
                  ]
              }
          }
      ]
  }'

Connection types

Three connection modes exist:

TLS (recommended) — add certificates to the keystore first, then reference the keystore-id in the connection request (shown in Steps 3 and 4 above).

INSECURE — skips TLS certificate validation. Equivalent to the --skip-verify flag in gnmic. For dev and lab environments only.

PLAINTEXT — non-TLS connection with no encryption. Set "connection-type": "PLAINTEXT" in connection-parameters.

# Insecure connection (dev/test only)
curl --request PUT \
  'http://127.0.0.1:8888/restconf/data/network-topology:network-topology/topology=gnmi-topology/node=node-id-1' \
  --header 'Content-Type: application/json' \
  --data-raw '{
      "node": [
          {
              "node-id": "node-id-1",
              "connection-parameters": {
                  "host": "127.0.0.1",
                  "port": 9090,
                  "connection-type": "INSECURE"
              }
          }
      ]
  }'

Running with docker

To skip the local build, run the controller in Docker:

# Build the Docker image
mvn clean install -P docker

# Run the container
docker run -it --name lighty-rcgnmi --network host --rm lighty-rcgnmi

To mount a custom configuration:

docker run -it --name lighty-rcgnmi --network host \
  -v /absolute/path/to/configuration.json:/lighty-rcgnmi/configuration.json \
  -v /absolute/path/to/log4j2.xml:/lighty-rcgnmi/log4j2.xml \
  --rm lighty-rcgnmi -c configuration.json -l log4j2.xml

Deploying to Kubernetes

A Helm chart is included in the repository under lighty-rcgnmi-app-helm/helm. With a running cluster (tested with minikube / microk8s):

# For microk8s — import the Docker image first
bash lighty-rcgnmi-app-helm/helm/microk8s-uploadDocker.sh

# Install the chart
cd lighty-rcgnmi-app-helm/helm
microk8s helm3 install lighty-rcgnmi-app ./lighty-rcgnmi-app-helm/

# Uninstall
microk8s helm3 uninstall lighty-rcgnmi-app

Startup configuration (initial YANG-modelled data, device connection nodes) goes into configmaps.yaml, so you do not need to rebuild the image per environment.

Using the Karaf distribution (ODL Native)

Teams already on the OpenDaylight Karaf distribution can install the gNMI plugin as a feature from the opendaylight/gnmi repository:

# Build from the gnmi repo root
mvn clean install

# Navigate to the built Karaf distribution and start it
cd karaf/target/assembly/bin
./karaf

# Inside the Karaf console
feature:install odl-gnmi-all

The RESTCONF API is on port 8181 for Karaf deployments. The request paths use /rests/ rather than /restconf/, but the gNMI topology paths and payloads are identical:

# Karaf — note the different port and /rests/ prefix
curl --request GET \
  'http://127.0.0.1:8181/rests/data/network-topology:network-topology/topology=gnmi-topology/node=gnmi-simulator' \
  -u admin:admin

Runtime log configuration

Default logging uses Log4j2. To override at startup:

java -Dlog4j.configurationFile=/path/to/log4j2.xml -jar lighty-rcgnmi-app-<version>.jar

Log levels can also be changed at runtime without restarting, using JMX:

jconsole <ip>:1099

Navigate to MBeans → org.apache.logging.log4j2 → loggers → StatusLogger → level and double-click the value to change it.

What you have now

Running all the steps above gives you:

  • A gNMI controller with a RESTCONF API, backed by OpenDaylight's MD-SAL and YANG Tools, starting in under 15 seconds.
  • A device mount point that translates standard HTTP verbs into transactional gNMI Get and Set operations.
  • A local simulator for iterating against OpenConfig YANG models without touching real hardware.
  • Clear paths to Docker and Kubernetes deployment when you are ready to move off a laptop.

The lighty-gnmi-community-restconf-app is the reference implementation. Once you understand the request flow (RESTCONF path → MD-SAL → gNMI mount point → device), extending it to your own YANG models or adding northbound logic comes down to configuration and plugin wiring.


Resources:

Related Articles