by Claudio Gasparini | Leave us your feedback on this post!
As a company with highly skilled people and experience in networking and OpenDaylight, PANTHEON.tech provides solutions to any problem or requirement our clients bring up. In this case, we are going to illustrate what we can do on showcasing the workflow of a project.
Identifying a need
The first step was to identify a need; one of the main issues of working with data-store is that we lose data when the Controller goes down.

Proposing a solution
Once we’ve identified the need, we start looking for possible solutions, analyzing each one’s pros and cons, looking for the best answer available. In this case, the best available solution was to replace the in-memory ODL datastore with a persistent database: the Apache Cassandra Data Store.
What is Cassandra?
If you need scalability and high availability without compromising performance, the Apache Cassandra database is the right choice for you. It is the perfect platform for mission-critical data thanks to linear scalability and proven fault-tolerance on cloud infrastructure or commodity hardware.

Cassandra is able of replicating across multiple datacenters and it’s best in the class. With her, your users are provided with lower latency – and you with peace of mind, if you realize how simple surviving a regional outage is.
Defining the solution requirements
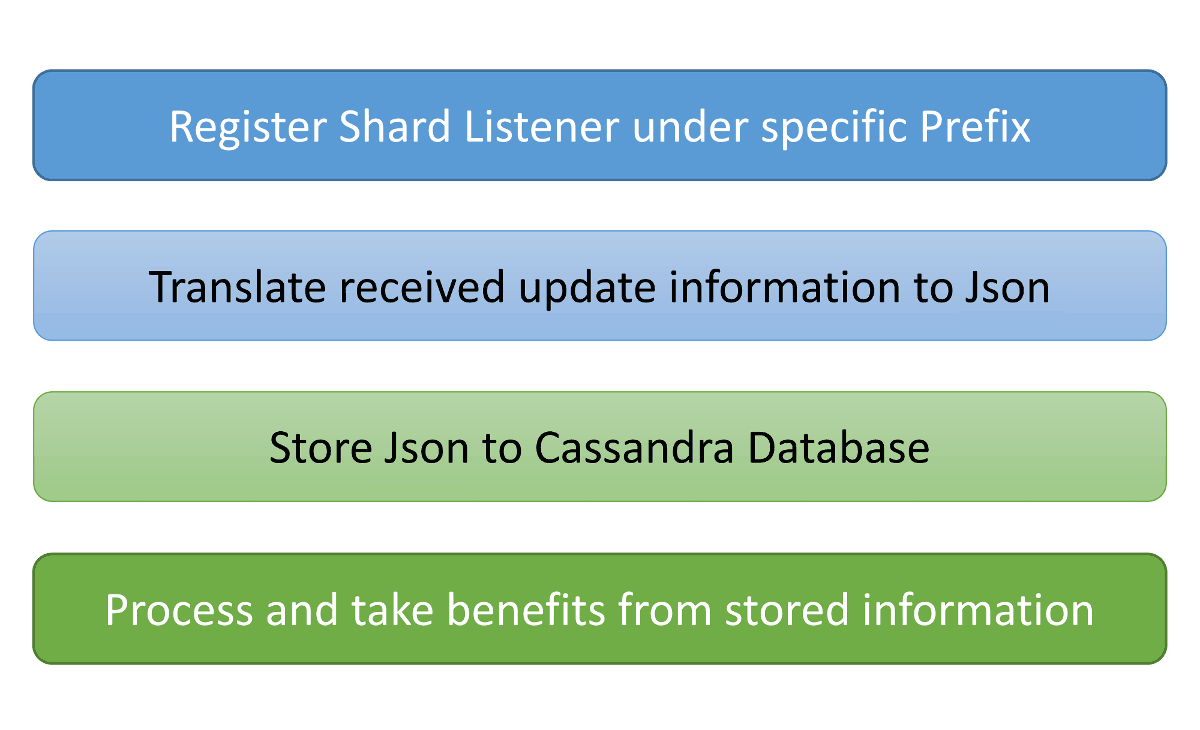
We need to define the requirements for the proposed solution: what will it do, and how, requirements from the user. For this project, we’ve decided that the user would need to register the service at a specific prefix, pointing at a specific path on a shard which the user is interested in storing.
The service will be listening to any changes under this and whenever the information is updated, it will take care of transforming the information into the JSON format, and store it in Cassandra.
Implementing the solution & testing
We’ve defined the requirements and have selected the solution. We’ve identified the steps required/wanted to achieve the results expected. Based upon them, we’ve created the tasks required and have implemented them. Finally, we shall test the result. We can see some of the anticipated results in the table below.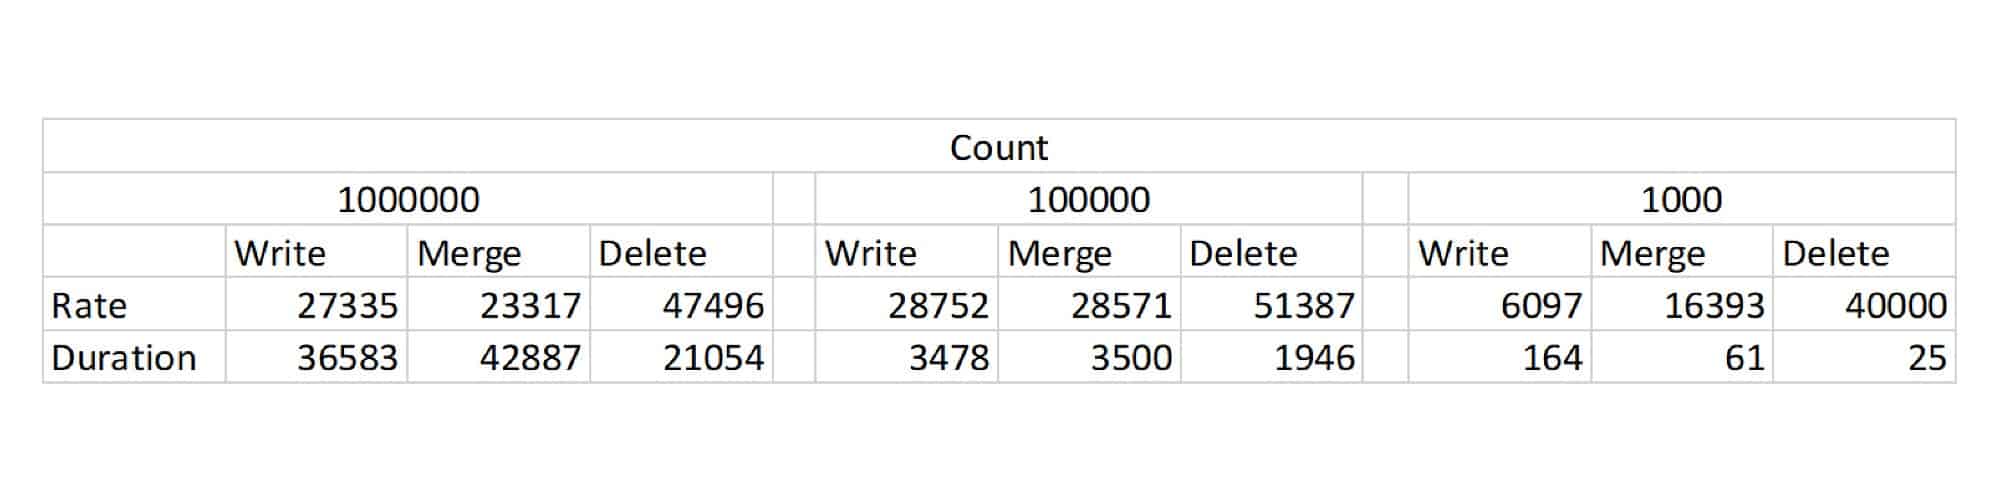
- Rate: Writes per second rate.
- Duration: Request duration in milliseconds.
- Count: A number of changes applied to simulated
* Benchmark, Karaf and Cassandra were running under same Virtual Machine, with 8G RAM and 4 Processors dedicated
[av_hr class='default' height='50' shadow='no-shadow' position='center' custom_border='av-border-thin' custom_width='50px' custom_border_color='' custom_margin_top='30px' custom_margin_bottom='30px' icon_select='yes' custom_icon_color='' icon='ue808' font='entypo-fontello' custom_class='' admin_preview_bg='' av_uid='av-2o56so']
Use-cases
We’ve identified one use case for this project - which is to have a persistent data-store. But the list of possible benefits does not end there.
Given the case that we were storing the OpenFlow statistics, we could benefit from having that information using Spark for applying Real-time data analytics & visualization on it. This would allow us to react and improve our network by, for example, banning or redirecting heavy traffic. Once we have the information, everything we need is to pick up the fruit.
For more information, please feel free to contact us.

![[How-To] Evaluate an Enterprise Network Orchestration & Automation Platform](https://pantheontech1.b-cdn.net/wp-content/uploads/2026/05/evaluate-orch-platform.jpg)