PANTHEON.tech
  • About Us
    • Expertise
    • Services
    • References & Partners
    • Tools
  • Products
    • Orchestration
    • Automation
    • Network Functions
    • Security
  • Blog & News
  • Career
  • Contact
  • Click to open the search input field Click to open the search input field Search
  • Menu Menu
  • Link to LinkedIn
  • Link to Youtube
  • Link to X
  • Link to Instagram
bierman RESTCONF

[OpenDaylight] Migrating Bierman RESTCONF to RFC 8040

May 3, 2022/in Blog, OpenDaylight /by PANTHEON.tech

The RESTCONF protocol implementation draft-bierman-netconf-restconf-02, named after A. Bierman, is HTTP-based and enables manipulating with YANG-defined data sets using a programmatic interface. It relies on the same datastore concepts as NETCONF, with modifications to enable HTTP-based CRUD operations.

Learn how to migrate from the legacy ‘draft-bierman-netconf-restconf-02‘ to RFC8040 in OpenDaylight.

NETCONF vs. RESTCONF

While NETCONF uses SSH for network device management, RESTCONF supports secure HTTP access (HTTPS). RESTCONF also allows for easy automation through a RESTful API, where the syntax of the datastore is defined in YANG.

YANG is a data modeling language used for model configuration – such as state data, or administrative actions. PANTHEON.tech offers an open-source tool for verifying YANG data in OpenDaylight or lighty.io, as well as an IntelliJ plugin called YANGinator.

What is YANG?

The YANG data modeling language is widely viewed as an essential tool for modeling configuration and state data manipulated over NETCONF, RESTCONF, or gNMI.

RESTCONF/NETCONF Architecture

NETCONF defines configuration datastores and a set of CRUD operations (create, retrieve, update, delete). RESTCONF does the same but adheres to REST API & HTTPS compatibility.

The importance of RESTCONF lies therefore within its programmability and flexibility in network configurations automation use-cases.

By design, the architecture of this communication looks the same – a network device, composed of a data store (in YANG) and server (RETCONF or NETCONF), communicates with the target client through a protocol (RESTCONF or NETCONF):

RESTCONF/NETCONF flow

RESTCONF/NETCONF client communication flow.

RESTful API

REST is a generally established set of rules for establishing stateless, dependable online APIs. RESTful is an informal term for this web API, that follows the REST requirements.

RESTful APIs are primarily built on HTTP protocols for accessing resources via URL-encoded parameters and data transmission, using JSON or XML.

OpenDaylight was one of the early adopters of the RESTCONF protocol. For increased compatibility, two RESTCONF implementations are supported today – the legacy draft-bierman-netconf-restconf-02 & RFC8040.

What’s New in RFC8040?

The biggest, newest difference in the RFC8040 implementation of RESTCONF, in comparison to the legacy Bierman implementation, is the transition to YANG 1.1 support.

YANG 1.1 introduces a new type of RPC operation, called actions. These actions enable RPC operations to be attached to selected nodes in the data schema. YANG Library is a set of YANG modules with their revisions, features, and other rewritten functions.

Other new features include fresh XPath functions, an option to define asynchronous notifications (with schema nodes), and more. For a more detailed insight, we recommend reading this comprehensive list of changes.

Migration from Legacy RESTCONF Implementation

Since the RFC8040 RESTCONF implementation is now in General Availability and ready to replace the legacy Bierman draft, PANTHEON.tech has decided to stop supporting the draft implementation and help customers with migration.

Contact PANTHEON.tech for support in migrating RESTCONF implementations from draft-bierman-netconf-restconf-02 to RFC8040.

What is Network Fabric?

[What Is] Network Fabric: Automation & Monitoring

June 9, 2021/in Blog, OpenDaylight, SDN /by PANTHEON.tech

Network fabric describes a mesh network topology with virtual or physical network elements, forming a single fabric.

What is it?

This trivial metaphor does not do justice to the industry term, which describes the performance and functionality of mostly L2 & L3 network topologies. For nodes to be interconnected and reach equal connectivity between each other, the term network fabric (NF) completely omits L1 (trivial) networks.

Primary performance goals include:

  • Abundancy – sufficient bandwidth should be present, so each node achieves equal speed when communicating in the topology
  • Redundancy – a topology has enough devices, to guarantee availability and failure coverage
  • Latency – as low as it can get

For enterprises with a lot of different users and devices connected via a network, maintaining a network fabric is essential to keep up with policies, security, and diverse requirements for each part of a network.

A network controller, like OpenDaylight, or lighty.io, would help see the entire network as a single device – creating a fabric of sorts.

Types & Future

A network topology would traditionally consist of hardware devices – access points, routers, or ethernet switches. We recognize two modern variants:

  1. Ethernet NF – an ethernet, which recognizes all components in a network, like resources, paths & nodes.
  2. IP Fabric – utilizes BGP as a routing protocol & EVPN as an overlay

The major enabler of modernizing networking is virtualization, resulting in virtual network fabric. 

Virtualization (based on the concept of NFVs – network function virtualization), replaces hardware in a network topology with virtual counterparts. This in turn enables:

  • Reduced security risks & errors
  • Improved network scaling
  • Remote maintenance & support

lighty.io: Network Fabric Management & Automation

Migrating to a fabric-based, automated network is easy with PANTHEON.tech.

lighty.io provides a versatile & user-friendly SDN controller experience, for your virtualized NF.

With ease-of-use in mind and powered by JavaSE, lighty.io is the ideal companion for your NF virtualization plans.

Try lighty.io for free!

Network controllers, such as lighty.io, help you create, configure & monitor the NF your business requires.

If OpenDaylight is your go-to platform for network automation, you can rely on PANTHEON.tech to provide the best possible support, training, or integration.

PANTHEON.tech: OpenDaylight Services


OpenDaylight Performance Testing

Ultimate OpenDaylight Performance Testing

May 18, 2021/in Blog, OpenDaylight /by PANTHEON.tech

by Martin Baláž | Subscribe to our newsletter!

PANTHEON.tech has contributed to another important milestone for the ODL community – OpenDaylight Performance Testing.

You might have seen our recent contribution to the ONAP CPS component, were focused on performance testing as well. Our team worked tirelessly on enabling the OpenDaylight community to test the performance of their NETCONF implementation. More on that below.

NETCONF Performance Testing

To be able to manage hundreds or thousands of NETCONF enabled devices without any slowdown, performance plays a crucial role. The time needed to process requests regarding NETCONF devices causes additional latency in network workflow, therefore the controller needs to be able to process all incoming requests as fast as possible.

What is NETCONF?

The NETCONF protocol is a fairly simple mechanism, throughout which network devices can be easily managed. Also, configuration data information can be uploaded, edited, and retrieved as well.

NETCONF enables device exposure through a formal API (application programming interface). The API is then used by applications to send/receive configuration data sets either in full or partial segments.

The OpenDaylight controller supports the NETCONF protocol in two roles:

  • as a server (Northbound plugin)
  • as a client (Southbound plugin)

NETCONF & RESTCONF in OpenDaylight

The Northbound plugin is an alternative interface for MD-SAL. It gives users the capability to read and write data from the MD-SAL data store, to invoke its RPCs.

The Southbound plugin’s capability lies in connecting towards remote NETCONF devices. It exposes their configuration or operational datastores, RPCs, or notifications, as MD-SAL mounting points.

Mount points then allow applications or remote users, to interact with mounted devices via RESTCONF.

Scalability Tests

Scalability testing is a technique of measuring system reactions in terms of performance, with gradually increased demands. It expresses how well the system can undertake an increased amount of requests, and if upgrading computer hardware improves the overall performance. From the perspective of data centers, it is a very important property.

It is frequent. that the number of customers or amount of requests increases over time and the OpenDaylight controller needs to adapt to be able to cope with it.

Test Scenarios

There are four test scenarios. These scenarios involve both NETCONF plugins, northbound and southbound. Each of them is examined from the perspective of scalability. During all tests, the maximum OpenDaylight heap space was set to 8GB.

The setup we used was OpenDaylight Aluminium, with two custom changes (this and that). These are already merged in the newest Silicon release.

Southbound: Maximum Devices Test

The main goal of this test is to measure how many devices can be connected to the controller with a limited amount of heap memory. Simulated devices were initialized with the following set of YANG models:

  • ietf-netconf-monitoring 
  • ietf-netconf-monitoring-extension  (OpenDaylight extensions to ietf-netconf-monitoring)
  • ietf-yang-types
  • ietf-inet-types

Devices were connected by sending a large batch of configurations, with the ultimate goal of connecting as many devices as soon as possible, without waiting for the previous batch of devices to be fully connected.

The maximum number of NETCONF devices is set to 47.000. It is based on the fact, that ports used by NETCONF devices start at the value of 17.830 and gradually use up ports to the maximum value of ports on a single host – which is 65.535. This range contains 47.705 possible ports.

Heap Size Connection Batch Size TCP Max Devices TCP Execution Time SSH Max Devices SSH Execution time
2GB 1k 47 000* 14m 23s 26 000 11m 5s
2GB 2k 47 000* 14m 21s 26 000 11m 12s
4GB 1k 47 000* 13m 26s 47 000* 21m 22s
4GB 2k 47 000* 13m 17s 47 000* 21m 19s

Table 1– Southbound scale test results

*- reached the maximum number of created simulated NETCONF devices, while running all devices on localhost


Northbound: Performance Test

This test tries to write l2fibs entries (ncmount-l2fib@2016-03-07.yang modeled) to the controller’s datastore, through the NETCONF Northbound plugin, as fast as possible.

Requests were sent two ways:

  • Synchronously: Each next request was sent, after receiving an answer for the previous request.
  • Asynchronously:  Sending a request as fast as possible, without waiting for a response for any previous request. The time spent processing requests was calculated as a time interval between sending the first request and receiving a response for the last request.
Clients Client type l2fib/req total l2fibs TCP performance SSH performance
1 Sync 1 100 000 1 413 requests/s

1 413 fibs/s

887 requests/s

887 fibs/s

1 Async 1 100 000 3 422 requests/s

3 422 fibs/s

3 281 requests/s

3 281 fibs/s

1 Sync 100 500 000 300 requests/s

30 028 fibs/s

138 requests/s

13 810 fibs/s

1 Async 100 500 000 388 requests/s

38 844 fibs/s

378 requests/s

37 896 fibs/s

1 Sync 500 1 000 000 58 requests/s

29 064 fibs/s

20 requests/s

10 019 fibs/s

1 Async 500 1 000 000 83 requests/s

41 645 fibs/s

80 requests/s

40 454 fibs/s

1 Sync 1 000 1 000 000 33 requests/s

33 230 fibs/s

15 requests/s

15 252 fibs/s

1 Async 1 000 1 000 000 41 requests/s

41 069 fibs/s

39 requests/s

39 826 fibs/s

8 Sync 1 400 000 8 750 requests/s

8 750 fibs/s

4 830 requests/s

4 830 fibs/s

8 Async 1 400 000 13 234 requests/s

13 234 fibs/s

5 051 requests/s

5 051 fibs/s

16 Sync 1 400 000 9 868 requests/s

9 868 fibs/s

5 715 requests/s

5 715 fibs/s

16 Async 1 400 000 12 761 requests/s

12 761 fibs/s

4 984 requests/s

4 984 fibs/s

8 Sync 100 1 600 000 573 requests/s

57 327 fibs/s

366 requests/s

36 636 fibs/s

8 Async 100 1 600 000 572 requests/s

57 234 fibs/s

340 requests/s

34 044 fibs/s

16 Sync 100 1 600 000 545 requests/s

54 533 fibs/s

355 requests/s

35 502 fibs/s

16 Async 100 1 600 000 542 requests/s

54 277 fibs/s

328 requests/s

32 860 fibs/s

Table 2 – Northbound performance test results


Northbound: Scalability Tests

In terms of scalability, the NETCONF Northbound plugin was tested from two perspectives.

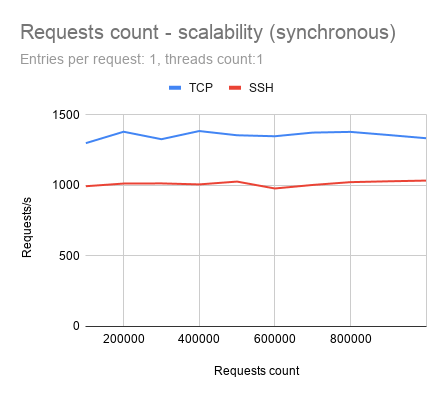
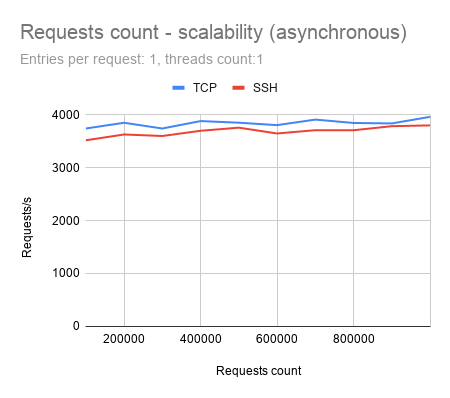
First, how well can OpenDaylight sustain performance (number of processed requests per second), while increasing the total amount of sent requests? Tests were executed in both variants, sending requests synchronously and also asynchronously.

In this scenario, it is desired, that the performance would be held around a constant value during all test cases.

Requests count scalability synchronous

Diagram 1: NETCONF Northbound requests count scalability (synchronous)

Requests count - scalability (asynchronous)

Diagram 2: NETCONF Northbound requests count scalability (asynchronous)

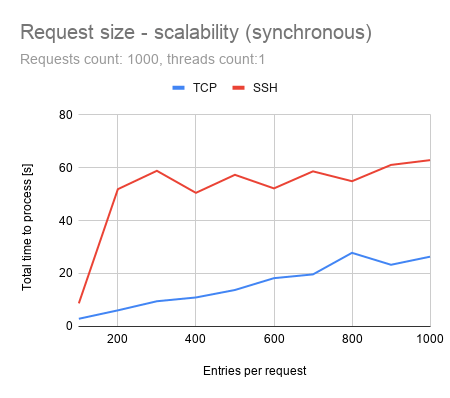
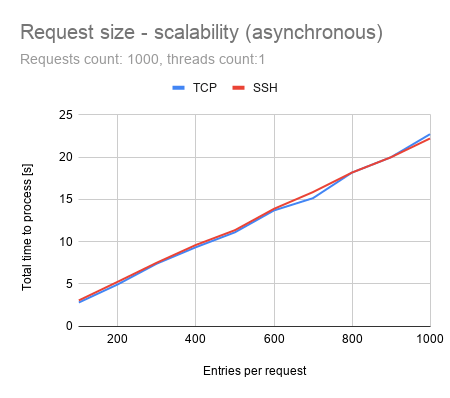
In the second case, we examined, how much time is needed to process all requests, affected by gradually increased request size (amount of elements sent within one request).

It is desired, that the total time needed to process all requests would be equal, or smaller, than the direct proportion of request size.

Request size - scalability (synchronous)

Diagram 3: NETCONF Northbound request size scalability (synchronous)

Request size - scalability (asynchronous)

Diagram 4: NETCONF Northbound request size scalability (asynchronous)


Southbound: Performance Test

The purpose of this test is to measure, how many notifications, containing prefixes, can be received within one second.

All notifications were sent from a single NETCONF simulated device. No further processing of these notifications was done, except for counting received notifications, which was needed to calculate the performance results.

The model of these notifications is example-notifications@2015-06-11.yang.  The time needed to process notifications is calculated as the time interval between receiving first the notification and receiving the last notification.

All notifications are sent asynchronously, while there are no responses for NETCONF notifications.

Prefixes/Notifications Total Prefixes TCP Performance  SSH Performance
1 100 000 4 365 notifications/s

4 365 prefixes/s

4 432 notifications/s

4 432 prefixes/s

2 200 000 3 777 notifications/s

7 554 prefixes/s

3 622 notifications/s

7 245 prefixes/s

10 1 000 000 1 516 notifications/s

15 167 prefixes/s

1 486 notifications/s

14 868 prefixes/s

Table 3 – Southbound performance test results


Southbound: Scalability Tests

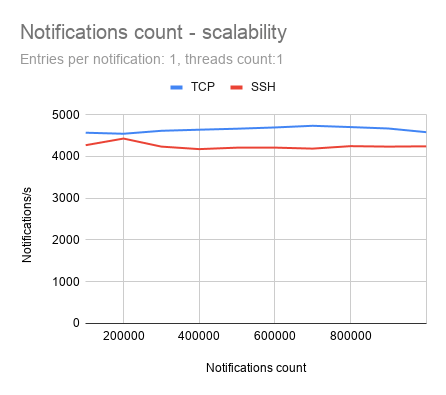
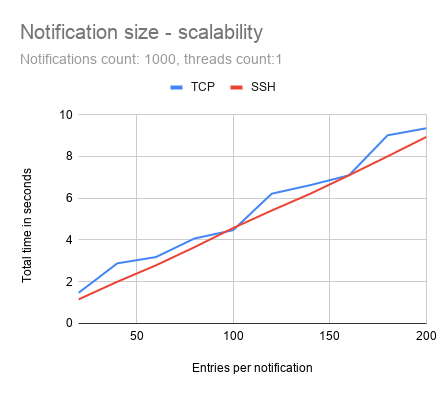
Scalability tests for the Southbound plugin were executed similarly to tests from the Northbound plugin – running both scenarios. Results are calculated by examining changes in performance, caused by an increasing amount of notifications and the total time needed, to process all notifications, while increasing the number of entries per notification.

Notifications count - scalability

Diagram 5: NETCONF Southbound notifications count scalability

Notification size - scalability

Diagram 6: NETCONF Southbound notifications size scalability


OpenDaylight E2E Performance Test

In this test, the client tries to write vrf-routes (modeled by Cisco-IOS-XR-ip-static-cfg@2013-07-22.yang) to NETCONF enabled devices via the OpenDaylight controller.

It sends vrf-routes via RESTCONF to the controller, using the specific RPC ncmount:write-routes. The controller is responsible for storing these data into the simulated devices, via NETCONF.

Requests were sent two ways:

  • Synchronously: when each request was sent after receiving an answer for the previous request
  • Asynchronously: sending multiple requests as fast as possible, while maintaining the maximum number of 1000 concurrent pending requests, for which response has not yet been received.
Clients Client type prefixes/request total prefixes TCP performance SSH performance
1 Sync 1 20 000 181 requests/s

181 routes/s

99 requests/s

99 routes/s

1 Async 1 20 000 583 requests/s

583 routes/s

653 requests/s

653 routes/s

1 Sync 10 200 000 127 requests/s

1 271 routes/s

89 requests/s

892 routes/s

1 Async 10 200 000 354 requests/s

3 546 routes/s

3 44 requests/s

3 444 routes/s

1 Sync 50 1 000 000 64 requests/s

3 222 routes/s

44 requests/s

2 209 routes/s

1 Async 50 1 000 000 136 requests/s

6 812 routes/s

138 requests/s

6 920 routes/s

16 Sync 1 20 000 1 318 requests/s

1 318 routes/s

424 requests/s

424 routes/s

16 Async 1 20 000 1 415 requests/s

1 415 routes/s

1 131 requests/s

1 131 routes/s

16 Sync 10 200 000 1 056 requests/s

10 564 routes/s

631 requests/s

6313  routes/s

16 Async 10 200 000 1 134 requests/s

11 340 routes/s

854 requests/s

8 540 routes/s

16 Sync 50 1 000 000 642 requests/s

32 132 routes/s

170 requests/s

8 519 routes/s

16 Async 50 1 000 000 639 requests/s

31 953 routes/s

510 requests/s

25 523 routes/s

32 Sync 1 320 000 2 197 requests/s

2 197 routes/s

921 requests/s

921 routes/s

32 Async 1 320 000 2 266 requests/s

2 266 routes/s

1 868 requests/s

1 868 routes/s

32 Sync 10 3 200 000 1 671 requests/s

16 713 routes/s

697 requests/s

6 974 routes/s

32 Async 10 3 200 000 1 769 requests/s

17 696 routes/s

1 384 requests/s

13 840 routes/s

32 Sync 50 16 000 000 797 requests/s

39 854 routes/s

356 requests/s

17 839 routes/s

32 Async 50 16 000 000 803 requests/s

40 179 routes/s

616 requests/s

30 809 routes/s

64 Sync 1 320 000 2 293 requests/s

2 293 routes/s

1 300 requests/s

1 300 routes/s

64 Async 1 320 000 2 280 requests/s

2 280 routes/s

1 825 requests/s

1 825 routes/s

64 Sync 10 3 200 000 1 698 requests/s

16 985 routes/s

1 063 requests/s

10 639 routes/s

64 Async 10 3 200 000 1 709 requests/s

17 092 routes/s

1 363 requests/s

13 631 routes/s

64 Sync 50 16 000 000 808 requests/s

40 444 routes/s

563 requests/s

28 172 routes/s

64 Async 50 16 000 000 809 requests/s

40 456 routes/s

616 requests/s

30 847 routes/s

Table 4 – E2E performance test results

E2E Scalability Tests 

These tests were executed just like the previous scale test cases – by increasing the number of requests and request size.

Requests count - scalability (synchronous)
Request count - scalelability (asynchronous)
Request size - scalability (synchronous)
Request size - scalability (asynchronous)

Conclusion

The test results show good scalability of OpenDaylight in terms of keeping almost constant performance while processing larger requests and the ability to process a growing size of requests without decreasing final performance too much.

The only exceptions were cases when requests were sent synchronously using SSH protocol. There is a sudden, significant increase in processing time when request size exceeds the value of 100. The maximum number of connected devices shows good results within the ability to connect more than 47 000 devices with 4GB of RAM and 26 000 devices with 2GB of RAM.

By using the TCP protocol, those numbers are even higher. TCP protocol, in comparison with SSH, results as the faster one, but at the cost of many advantages that the SSH protocol brings, like data encryption, which would be critical for companies, which needs to keep their data safe.

Examining differences in performance between SSH and TCP protocol is part of further investigation and more parts on Performance Testing in OpenDaylight, so stay tuned and subscribed!

lighty.io RNC Application

Manage Network Elements in SDN | lighty.io RNC

April 9, 2021/in Blog, OpenDaylight /by PANTHEON.tech

What if I told you, that there is an out-of-the-box pre-packaged microservice-ready application you can easily use for managing network elements in your SDN use case? And that it is open-sourced and you can try it for free? Yep, you heard it right.

The application consists of lighty.io modules packed together within various technologies – ready to be used right away.

Do you have a more complex deployment, and are using Helm to deploy into Kubernetes? Or you just need to use Docker images? Or you want to handle everything by yourself and the only thing you need is a runnable application? We got you covered.

lighty.io RESTCONF-NETCONF Application

The most common use case we see at our customers is for an SDN controller to handle NETCONF devices via REST endpoints. This is due to ease of integration to e.g. OSS and BSS systems, or ITSM systems, as these already have REST API interfaces and adapters.

This is where our first lighty.io application comes in – the lighty.io RNC application, where RNC stands for RESTCONF-NETCONF-controller.

Use Cases: Facilitate & Translate Network Device Communication

Imagine a scenario, where the ONAP Controller Design Studio (CDS) component needs to communicate with both RESTCONF & NETCONF devices.

lighty.io RESTCONF-NETCONF Controller enables and facilitates communication to both RESTCONF/NETCONF devices while translating communication both ways!

Its usability and features can save you time and resources in a variety of telco related scenarios:

  • Data-Centers
  • OSS/BSS Integration (w/ NETCONF speaking devices & appliances)
  • Service Provider Networks (Access, Edge, etc.)
  • Central Office

Components

As the name suggests, it includes the RESTCONF northbound plugin and NETCONF southbound plugin at the bottom of the lighty.io controller.

At the heart of the application is the lighty.io controller. It provides core OpenDaylight services like MD-SAL, datastores, YANG Tools, handles global schema context, and more.

NETCONF southbound plugin serves as an adapter for NETCONF devices. It allows lighty.io to connect and communicate with them, execute RPCs, and read/write configuration.

RESTCONF northbound plugin is responsible for RESTCONF endpoints. These are used for communication between a user (or another application, like the aforementioned OSS/BSS systems, workflow managers, or ServiceNow for example) and the lighty.io application. RESTCONF gives us access to the so-called mount points serving as a proxy to devices.

These three mentioned components make up the core of the lighty.io RNC Application. Together, they form a base of the application. But of course, there is no such thing as one solution to rule them all.

Oftentimes, there is a need for side-car functionalities to the RNC, that is best built bespoke, that fulfill some custom business logic. Or enhance the RESTCONF API endpoints with side-load data.

We provide the means to customize and configure the lighty.io RNC application via configuration files to better fit your needs.

And if there is something we didn’t cover, do not hesitate to contact us or create a Pull Request or issue in our GitHub repository. We provide commercial custom development, developer, and operational support to enhance your efforts.

Configuration

You can find some common options in the JSON configuration file, like:

  • what address and port is RESTCONF listening to
  • what is the base URL of the RC endpoints to RESTCONF endpoints
  • what is the name of the network topology where NETCONF is listening
  • which YANG models should be available in the lighty.io app itself
  • and more

But wait! There is more!

There are some special configurations too with a bit bigger impact

One of them is an option to enable HTTPS for RESTCONF endpoints. When useHttps is set to true, HTTPS will be enabled. It is possible to specify a custom key-store too and we recommend doing so. But just for some tests default keystore should be more than enough.

The option enableAAA is used to enable the lighty-aaa module. This module is responsible for authorization, authentication, and accounting which for example enables to use Basic Authentication for RESTCONF northbound interface.

Generally, it’s a good practice to consider SDN controllers like this one as a stateless service. Especially in a complex and dynamic deployment with a bigger amount of services.

But if you want to initialize configurational datastore with some data right after startup, it’s possible with the “initialConfigData“ part of the configuration. For example, you insert connection information about a NETCONF device, so the lighty.io application will connect to it right after it starts.

Examples and a bit more explanation of these configuration options can be found in a lighty.io RESTCONF-NETCONF application README.md file.

Deployment

As mentioned in the beginning, we provide three main types of deployment: Helm chart for deployment in Kubernetes, Docker image, and a “zip” distribution containing all necessary jar files to run the application.

A step-by-step guide on how to build these artifacts from code can be found in a lighty.io RNC README.md file. It also contains steps on how to start and configure it.

Helm chart and Docker image can be also downloaded from public repositories.

Docker image can be downloaded from our GitHub Packages or via command:

docker pull ghcr.io/pantheontech/lighty-rnc:latest

Helm chart can be downloaded from our GitHub helm-charts repository and you can add it into your Helm environment via these commands:

helm repo add pantheon-helm-repo https://pantheontech.github.io/helm-charts/ 
helm repo update

Give lighty.io RNC a try

In case you need an SDN controller for NETCONF devices providing RESTCONF endpoints, give lighty.io RNC a try. The guides linked above should be pretty straightforward.

And if you need any help, got some cool ideas, or want to use our solutions, you can contact us here!


by Samuel Kontriš | Leave us your feedback on this post!

You can contact us here.

Explore our PANTHEON.tech GitHub.

Watch our YouTube Channel.

static distro

[OpenDaylight] Static Distribution

February 15, 2021/in Blog, OpenDaylight /by PANTHEON.tech

OpenDaylight‘s distribution package remained the same for several years. But what if there is a different way to do this, making distribution more aligned with the latest containerization trends? This is where an OpenDaylight Static Distribution comes to the rescue.

Original Distribution & Containerized Deployments

Let’s take a quick look at the usual way.

A standard distribution is made up of:

  • a pre-configured Apache Karaf
  • a full set of OpenDaylight’s bundles (modules)

It’s an excellent strategy for when the user wants to choose modules and build his application dynamically from construction blocks. Additionally, Karaf provides a set of tools that can affect configuration and features in runtime.

However, when it comes to micro-services and containerized deployments, this approach confronts some best practices for operating containers – statelessness and immutability.

Perks of a Static Distribution

Starting from version 4.2.x, Apache Karaf provides the capability to build a static distribution, aiming to be more compatible with the containerized environment – and OpenDaylight can use that as well.

So, what are the differences between a static vs. dynamic distribution?

  • Specified List of Features

Instead of adding everything to the distribution, you only need to specify a minimal list of features and required bundles in your runtime, so only they will be installed. This would help produce a lightweight distribution package and omit unnecessary stuff, including some Karaf features from the default distribution.

  • Pre-Configured Boot-Features

Boot features are pre-configured, no need to execute any feature installations from Karaf’s shell.

  • Configuration Admin

Configuration admin is replaced with a read-only version that only picks up configuration files from the ‘/etc/’ folder.

  • Speed

Bundle dependencies are resolved and verified during the build phase, which leads to more stable builds overall.

With all these changes in place, we can achieve an almost entirely immutable distribution, which can be used for the containerized deployments.

How to Build a Static Distribution with OpenDaylight’s Components

The latest version of the odl-parent component introduced a new project called karaf-dist-static, which defines a minimal list of features needed by all OpenDaylight’s components (static framework, security libraries, etc.).

This can be used as a parent POM to create our own static distribution. Let’s try to use it and assemble a static distribution with some particular features.

  1. Assuming that you already have an empty pom.xml file, in the first step, we’re going to declare the karaf-dist-static project as a parent for our one:
    <parent>
        <groupId>org.opendaylight.odlparent</groupId>
        <artifactId>karaf-dist-static</artifactId>
        <version>8.1.1-SNAPSHOT</version>
    </parent>
  2. Optionally, you can override two properties to disable the assembling of .zip/tar.gz archives with a distribution. Default values are ‘true’ for both properties.Let’s make an assumption, that we only need the ZIP:
    <properties>
        <karaf.archiveTarGz>false</karaf.archiveTarGz>
        <karaf.archiveZip>true</karaf.archiveZip>
    </properties>


  3. This example aims to demonstrate how to produce a static distribution containing NETCONF southbound connectors and RESTCONF northbound implementation.Let’s add the corresponding items to the dependencies section:
    <dependencies>
       <dependency>
          <groupId>org.opendaylight.netconf</groupId>
          <artifactId>odl-netconf-connector-all</artifactId>
          <version>1.10.0-SNAPSHOT</version>
          <classifier>features</classifier>
          <type>xml</type>
       </dependency>
       <dependency>
          <groupId>org.opendaylight.netconf</groupId>
          <artifactId>odl-restconf-nb-rfc8040</artifactId>
          <version>1.13.0-SNAPSHOT</version>
          <classifier>features</classifier>
          <type>xml</type>
       </dependency>
    </dependencies>


  4. Once we have these features on the dependency list, we can add them to Karaf’s Maven plugin configuration. Usually, when you want to add some OpenDaylight’s features, you can use the <bootFeatures> container.This should work fine for everything, except features delivered with a Karaf framework (like ssh, diagnostic, etc.).

    When it comes to adding features provided by the Karaf framework, a <startupFeatures> block should be used; as we are going to check the installation of the features within the static distribution.

    First, let’s add the ‘ssh’ feature to the list.

    <build>
      <plugins>
        <plugin>
          <groupId>org.apache.karaf.tooling</groupId>
          <artifactId>karaf-maven-plugin</artifactId>
          <configuration>
             <bootFeatures combine.children="append">
                <feature>odl-netconf-connector-all</feature>
                <feature>odl-restconf-nb-rfc8040</feature>
             </bootFeatures>
          </configuration>
        </plugin>
      </plugins>
    </build>

    After applying all of these things, you should get a pom.xml file similar to the one below:

    <?xml version="1.0" encoding="UTF-8"?>
    <project xmlns="http://maven.apache.org/POM/4.0.0"
             xmlns:xsi="http://www.w3.org/2001/XMLSchema-instance"
             xsi:schemaLocation="http://maven.apache.org/POM/4.0.0 http://maven.apache.org/xsd/maven-4.0.0.xsd">
        <parent>
            <groupId>org.opendaylight.odlparent</groupId>
            <artifactId>karaf-dist-static</artifactId>
            <version>8.1.1-SNAPSHOT</version>
        </parent>
     
        <modelVersion>4.0.0</modelVersion>
        <groupId>org.opendaylight.examples</groupId>
        <artifactId>netconf-karaf-static</artifactId>
        <version>1.0.0-SNAPSHOT</version>
        <packaging>karaf-assembly</packaging>
     
        <properties>
            <karaf.archiveTarGz>false</karaf.archiveTarGz>
            <karaf.archiveZip>true</karaf.archiveZip>
        </properties>
     
        <dependencies>
            <dependency>
                <groupId>org.opendaylight.netconf</groupId>
                <artifactId>odl-netconf-connector-all</artifactId>
                <version>1.10.0-SNAPSHOT</version>
                <classifier>features</classifier>
                <type>xml</type>
            </dependency>
            <dependency>
                <groupId>org.opendaylight.netconf</groupId>
                <artifactId>odl-restconf-nb-rfc8040</artifactId>
                <version>1.13.0-SNAPSHOT</version>
                <classifier>features</classifier>
                <type>xml</type>
            </dependency>
        </dependencies>
        <build>
            <plugins>
                <plugin>
                    <groupId>org.apache.karaf.tooling</groupId>
                    <artifactId>karaf-maven-plugin</artifactId>
                    <configuration>
                        <startupFeatures combine.children="append">
                            <feature>ssh</feature>
                        </startupFeatures>
                        <bootFeatures combine.children="append">
                            <feature>odl-netconf-connector-all</feature>
                            <feature>odl-restconf-nb-rfc8040</feature>
                        </bootFeatures>
                    </configuration>
                </plugin>
            </plugins>
        </build>
    </project>

Once everything is ready, let’s build a project!

Building a project

mvn clean package

If you check the log messages, you probably will notice the KAR artifact is not the same one we had for dynamic distribution (in dynamic distribution, you can expect the following one – org.apache.karaf.features/framework/4.3.0/kar).

[INFO] Loading direct KAR and features XML dependencies
[INFO]    Standard startup Karaf KAR found: mvn:org.apache.karaf.features/static/4.3.0/kar
[INFO]    Feature static will be added as a startup feature

Eventually, we can check the output directory of the maven build – it should contain an ‘assembly’ folder with a static distribution we created and netconf-karaf-static-1.0.0-SNAPSHOT.zip archive that contains this distribution.

$ ls --group-directories-first -1 ./target
antrun
assembly
classes
dependency-maven-plugin-markers
site
checkstyle-cachefile
checkstyle-checker.xml
checkstyle-header.txt
checkstyle-result.xml
checkstyle-suppressions.xml
cpd.xml
netconf-karaf-static-1.0.0-SNAPSHOT.zip

While a ZIP archive can be used as an artifact, you would usually like to push to some repository; we will verify our distribution by running Karaf from the assembly folder.

./assembly/bin/karaf

If everything goes well, you should see some system messages saying that Karaf is started, following by a shell command-line interface:

Apache Karaf starting up. Press Enter to open the shell now...
100% [========================================================================]
Karaf started in 1s. Bundle stats: 50 active, 51 total
                                                                                            
    ________                       ________                .__  .__       .__     __      
    \_____  \ ______   ____   ____ \______ \ _____  ___.__.|  | |__| ____ |  |___/  |_    
     /   |   \\____ \_/ __ \ /    \ |    |  \\__  \<   |  ||  | |  |/ ___\|  |  \   __\   
    /    |    \  |_> >  ___/|   |  \|    `   \/ __ \\___  ||  |_|  / /_/  >   Y  \  |     
    \_______  /   __/ \___  >___|  /_______  (____  / ____||____/__\___  /|___|  /__|     
            \/|__|        \/     \/        \/     \/\/            /_____/      \/         
                                                                                            
 
Hit '<tab>' for a list of available commands
and '[cmd] --help' for help on a specific command.
Hit '<ctrl-d>' or type 'system:shutdown' or 'logout' to shutdown OpenDaylight.
 
opendaylight-user@root>

With a static distribution, you don’t need to do any feature installation manually.

Let’s just check if our features are running by executing the following command

feature:list | grep 'Started'

The produced output will contain a list of already started features; among them, you should find features we selected in our previous steps.

...
odl-netconf-connector    | 1.10.0.SNAPSHOT  │ Started │ odl-netconf-1.10.0-SNAPSHOT             │ OpenDaylight :: Netconf Connector
odl-restconf-nb-rfc8040  | 1.13.0.SNAPSHOT  │ Started │ odl-restconf-nb-rfc8040-1.13.0-SNAPSHOT │ OpenDaylight :: Restconf :: NB :: RFC8040
...

We can also run an additional check by sending a request to the corresponding RESTCONF endpoint:

curl -vs --user admin:admin 'http://localhost:8181/rests/data/network-topology:network-topology/topology=topology-netconf' | jq

The expected output would be the following:

{
  "network-topology:topology": [
    {
      "topology-id": "topology-netconf"
    }
  ]
}

What’s next?

Now, we can produce immutable & lightweight OpenDaylight distributions with a selected number of pre-installed features, which can be the first step to create Docker images that would be fully compliant for the containerized deployment.

Our next steps would be to make logging and clustered configuration more suitable for running in containers, but that’s a topic for another article.


by Oleksii Mozghovyi | Leave us your feedback on this post!

You can contact us here.

Explore our PANTHEON.tech GitHub.

Watch our YouTube Channel.

Filtering Data with Binding Query, using OpenDaylight

[OpenDaylight] Binding Query

February 7, 2021/in Blog, OpenDaylight /by PANTHEON.tech

Binding Query (BQ) is an MD-SAL module, currently located at OpenDaylight version master (7.0.5), 6.0.x, and 5.0.x. Its primary function is to filter data from the Binding Awareness model.

To use BQ, it is required to create QueryExpression and QueryExecutor. QueryExecutor contains BindingCodecTree and data represented by the Binding Awareness model. A filter will be applied to this data and all operations from QueryExpression.

QueryExpression is created from the QueryFactory class. Creating a QueryFactory is started with the querySubtree method. Here, it is entered as an instance identifier, and it has to be at the root of data from QueryExecutor.

The next step will be to create a path to the data, which we want to filter – and then apply the required filter. When QueryExpression is ready, it will be applied with the method executeQuery in QueryExecutor. One QueryExpression can be used on multiple QueryExecutors with the same data schema.

Prerequisites for Binding Query

Now, we will demonstrate how to actually use Binding Query. We will create a YANG model for this purpose:

module queryTest {
    yang-version 1.1;
    namespace urn:yang.query;
    prefix qt;
 
    revision 2021-01-20 {
        description
          "Initial revision";
    }
 
    grouping container-root {
        container container-root {
            leaf root-leaf {
                type string;
            }
 
            leaf-list root-leaf-list {
                type string;
            }
 
            container container-nested {
                leaf nested-leaf {
                    type uint32;
                }
            }
        }
    }
 
    grouping list-root {
        container list-root {
            list top-list {
                key "key-a key-b";
 
                leaf key-a {
                    type string;
                }
                leaf key-b {
                    type string;
                }
                list nested-list {
                    key "identifier";
 
                    leaf identifier {
                        type string;
                    }
 
                    leaf weight {
                        type int16;
                    }
                }
            }
        }
    }
 
    grouping choice {
        choice choice {
            case case-a {
                container case-a-container {
                    leaf case-a-leaf {
                        type int32;
                    }
                }
            }
            case case-b {
                list case-b-container {
                    key "key-cb";
                    leaf key-cb {
                        type string;
                    }
                }
            }
        }
    }
 
    container root {
        uses container-root;
        uses list-root;
        uses choice;
    }
}

Then, we will build and create a Binding Awareness model, with some test data from the provided YANG model.

public Root generateQueryData() {
    HashMap<NestedListKey, NestedList> nestedMap = new HashMap<>() {{
        put(new NestedListKey("NestedId"), new NestedListBuilder()
            .setIdentifier("NestedId")
            .setWeight((short) 10)
            .build());
        put(new NestedListKey("NestedId2"), new NestedListBuilder()
            .setIdentifier("NestedId2")
            .setWeight((short) 15)
            .build());
    }};

    HashMap<NestedListKey, NestedList> nestedMap2 = new HashMap<>() {{
        put(new NestedListKey("Nested2Id"), new NestedListBuilder()
            .setIdentifier("Nested2Id")
            .setWeight((short) 10)
            .build());
    }};

    HashMap<TopListKey, TopList> topMap = new HashMap<>() {{
        put(new TopListKey("keyA", "keyB"),
            new TopListBuilder()
                .setKeyA("keyA")
                .setKeyB("keyB")
                .setNestedList(nestedMap)
                .build());
        put(new TopListKey("keyA2", "keyB2"),
            new TopListBuilder()
                .setKeyA("keyA2")
                .setKeyB("keyB2")
                .setNestedList(nestedMap2)
                .build());
    }};

    HashMap<CaseBContainerKey, CaseBContainer> caseBMap = new HashMap<>() {{
        put(new CaseBContainerKey("test@test.com"),
            new CaseBContainerBuilder()
                .setKeyCb("test@test.com")
                .build());
        put(new CaseBContainerKey("test"),
            new CaseBContainerBuilder()
                .setKeyCb("test")
                .build());
    }};

    RootBuilder rootBuilder = new RootBuilder();
    rootBuilder.setContainerRoot(new ContainerRootBuilder()
                                     .setRootLeaf("root leaf")
                                     .setContainerNested(new ContainerNestedBuilder()
                                                             .setNestedLeaf(Uint32.valueOf(10))
                                                             .build())
                                     .setRootLeafList(new ArrayList<>() {{
                                         add("data1");
                                         add("data2");
                                         add("data3");
                                     }})
                                     .build());
    rootBuilder.setListRoot(new ListRootBuilder().setTopList(topMap).build());
    rootBuilder.setChoiceRoot(new CaseBBuilder()
                                  .setCaseBContainer(caseBMap)
                                  .build());
    return rootBuilder.build();
}

For better orientation in the test-data structure, there is also a JSON representation of the data we will use:

{
  "queryTest:root": {
    "container-root": {
      "root-leaf": "root leaf",
      "root-leaf-list": [
        "data1",
        "data2",
        "data3"
      ],
      "container-nested": {
        "nested-leaf": 10
      }
    },
    "list-root": {
      "top-list": [
        {
          "key-a": "keyA",
          "key-b": "keyB",
          "nested-list": [
            {
              "identifier": "NestedId",
              "weight": 10
            },
            {
              "identifier": "NestedId2",
              "weight": 15
            }
          ]
        },
        {
          "key-a": "keyA2",
          "key-b": "keyB2",
          "nested-list": []
        }
      ]
    },
    "choice": {
      "case-b-container": {
        "top-list": [
          {
            "key-cb": "test@test.com"
          },
          {
            "key-cb": "test"
          }
        ]
      }
    }
  }
}

From the Binding Awareness model queryTest shown above, we can create a QueryExecutor. In this example, we will use the SimpleQueryExecutor. As a builder parameter, we entered BindingCodecTree. Afterwards, this will be added into the Binding Awareness data by method, which we created above.

public QueryExecutor createExecutor() {
    return SimpleQueryExecutor.builder(CODEC)
        .add(generateQueryData())
        .build();
}

Create a Query & Filter Data

Now, we can start with an example on how to create a query and filter some data. In the first example, we will describe how to filter the container by the value of his leaf. In the next steps, we will create a QueryExpression.

  1. First, we will create a QueryFactory from the DefaultQueryFactory. The DefaultQueryFactory constructor takes BindingCodecTree as a parameter.

    QueryFactory factory = new DefaultQueryFactory(CODEC);
  2. The next step is to create the DescendantQueryBuilder from QueryFactory. The querySubtree method takes the instance identifier as a parameter. This identifier should be a root node from our model. In this case, it is a container with the name root.
    DescendantQueryBuilder<Root> decadentQueryRootBuilder
        = factory.querySubtree(InstanceIdentifier.create(Root.class));
  3. Then we will set the path to the parent container of leaf, depending on which value we want to filter.
    DescendantQueryBuilder<ContainerRoot> decadentQueryContainerRootBuilder 
    = decadentQueryRootBuilder.extractChild(ContainerRoot.class);
  4. Now we create the StringMatchingBuilder, with the value of the leaf and name root-leaf, which we want to match.
    StringMatchBuilder<ContainerRoot> stringMatchBuilder = decadentQueryContainerRootBuilder.matching()
        .leaf(ContainerRoot::getRootLeaf);
  5. The last step is to define which values should be filtered and then build the QueryExpression. For this case, we will filter a specific leaf, with the value “root leaf”.
    QueryExpression<ContainerRoot> matchRootLeaf = stringMatchBuilder.valueEquals("root leaf").build();


Now, the QueryExpression can be used to filter data from QueryExecutor. For creating QueryExecutor, we use the method defined above in “test query data”.

QueryExecutor executor = createExecutor();
      QueryResult<ContainerRoot> items = executor.executeQuery(matchRootLeaf);

The entire previous example in one block will look like this:

QueryFactory factory = new DefaultQueryFactory(CODEC);
        QueryExpression<ContainerRoot> rootLeafQueryExpression = factory
            .querySubtree(InstanceIdentifier.create(Root.class))
            .extractChild(ContainerRoot.class)
            .matching()
            .leaf(ContainerRoot::getRootLeaf)
            .valueEquals("root leaf")
            .build();
        
        QueryExecutor executor = createExecutor();
        QueryResult<ContainerRoot> result = executor.executeQuery(rootLeafQueryExpression);

When we validate the result, we will find, that only one item matched our condition in the query:

assertEquals(1, result.getItems().size());
      String resultItem = result.getItems().stream()
          .map(item -> item.object().getRootLeaf())
          .findFirst()
          .orElse(null);
      assertEquals("root leaf", resultItem);

Filter Nested-List Data

The next example will show how to use Binding Query to filter data from nested-list. This example will filter nested-list items, where the weight parameter equals 10.

QueryFactory factory = new DefaultQueryFactory(CODEC);
 QueryExpression<NestedList> queryExpression = factory
     .querySubtree(InstanceIdentifier.create(Root.class))
     .extractChild(ListRoot.class)
     .extractChild(TopList.class)
     .extractChild(NestedList.class)
     .matching()
     .leaf(NestedList::getWeight)
     .valueEquals((short) 10)
     .build();

 QueryExecutor executor = createExecutor();
 QueryResult<NestedList> result = executor.executeQuery(queryExpression);
 assertEquals(2, result.getItems().size())

If we are required to filter nested-list items, but only from top-list with specific keys, then it will look like this:

QueryFactory factory = new DefaultQueryFactory(CODEC);
        QueryExpression<NestedList> queryExpression = factory
            .querySubtree(InstanceIdentifier.create(Root.class))
            .extractChild(ListRoot.class)
            .extractChild(TopList.class, new TopListKey("keyA", "keyB"))
            .extractChild(NestedList.class)
            .matching()
            .leaf(NestedList::getWeight)
            .valueEquals((short) 10)
            .build();

        QueryExecutor executor = createExecutor();
        QueryResult<NestedList> result = executor.executeQuery(queryExpression);
        assertEquals(1, result.getItems().size())

In case that we wanted to get top-list elements, but only those which contain nested-leaf items with a weight greater than, or equals to, 15. It is possible to set a match on top-list containers and then continue with a condition to nested-list. With number operations, we can execute greaterThanOrEqual, lessThanOrEqual, greaterThan, and lessThan methods.

QueryExpression<TopList> queryExpression = factory
            .querySubtree(InstanceIdentifier.create(Root.class))
            .extractChild(ListRoot.class)
            .extractChild(TopList.class)
            .matching()
            .childObject(NestedList.class)
            .leaf(NestedList::getWeight).greaterThanOrEqual((short) 15)
            .build();

        QueryExecutor executor = createExecutor();
        QueryResult<TopList> result = executor.executeQuery(queryExpression);
        assertEquals(1, result.getItems().size());

        List<TopList> topListResult = result.getItems().stream()
            .map(Item::object)
            .filter(item -> item.getKeyA().equals("keyA"))
            .filter(item -> item.getKeyB().equals("keyB"))
            .collect(Collectors.toList());
        assertEquals(1, topListResult.size());

The last example shows how to filter choice data and matching their values in key-cb leaf. Conditions that are required to meet are defined in the pattern, which matches the email address.

QueryFactory factory = new DefaultQueryFactory(CODEC);
       QueryExpression<CaseBContainer> queryExpression = factory
           .querySubtree(InstanceIdentifier.create(Root.class))
           .extractChild(CaseBContainer.class)
           .matching()
           .leaf(CaseBContainer::getKeyCb)
           .matchesPattern(Pattern.compile("^[A-Z0-9._%+-]+@[A-Z0-9.-]+\\.[A-Z]{2,6}$",
                                           Pattern.CASE_INSENSITIVE))
           .build();

       QueryExecutor executor = createExecutor();
       QueryResult<CaseBContainer> result = executor.executeQuery(queryExpression);

       assertEquals(1, result.getItems().size());

Binding Query can be used to filter important data, as is shown in previous examples. With Binding Query, it is possible to filter data with various options and get all the required information. Binding Query can also support matching string by patterns and simple filter operations with numbers.


by Peter Šuňa | Leave us your feedback on this post!

You can contact us at https://pantheon.tech/

Explore our Pantheon GitHub.

Watch our YouTube Channel.

Ultimate OpenDaylight Guide Part 1: Documentation & Testing

Ultimate OpenDaylight Guide | Part 1: Documentation & Testing

November 19, 2020/in OpenDaylight /by PANTHEON.tech

by Samuel Kontriš, Robert Varga, Filip Čúzy | Leave us your feedback on this post!


Welcome to Part 1 of the PANTHEON.tech Ultimate Guide to OpenDaylight! We will start off lightly with some tips & tricks regarding the tricky documentation, as well as some testing & building tips to speed up development!


Documentation

1. Website, Docs & Wiki

The differences between these three sources can be staggering. But no worries, we have got you covered!

  • OpenDaylight Docs – The holy grail for developers. The Docs page provides developers with all the important information to get started or go further.
  • OpenDaylight Wiki – A Confluence based wiki, for meeting minutes and other information, regarding the governance, projects structure, and other related stuff.
    • [As of 19.11.2020] Some links can be found by adding “-archive” to an older “wiki.opendaylight.org” link since not all information has been migrated.
  • OpenDaylight Website – general information, press releases & official documents needed for this product to be present – somewhere.

2. Dependencies between projects & distributions

  • Find out, which version of which core OpenDaylight project corresponds to which release.
    • You can go through various dependencies, by clicking a box in the right-down corner of the website:

odl dependency

3. Contributing to OpenDaylight

  • Learn the dos and don’ts of contributing to OpenDaylight. 

4. Useful Mailing Lists

There are tens (up to hundreds) of mailing lists you can join, so you are up-to-date with all the important information – even dev talks, thoughts, and discussions!

  • DEV – 231 members – all projects development list with high traffic.
  • Discuss – 382 members – a cross-project discussion
  • Release – 180 members – milestones & coordination of releases, informative if you wish to stay on top of all releases!
  • TSC – 236 members – the Technical Steering Committee acts as the guidance-council for the project

Testing & Building

1. Maven “Quick” Profile

There’s a “Quick” maven profile in most OpenDaylight projects. This profile skips a lot of tests and checks, which are unnecessary to run with each build.

This way, the build is much faster:

mvn clean install -Pq

2. GitHub x OpenDaylight

The OpenDaylight code is mirrored on GitHub! Since more people are familiar with the GitHub environment, rather than Gerrit, make sure to check out the official GitHub repo of ODL!

3. Gerrit

Working with Gerrit can be challenging and new for newcomers. Here is a great guide on the differences between the two.


You can contact us at https://pantheon.tech/

Explore our Pantheon GitHub.

Watch our YouTube Channel.

openapi opendaylight

OpenAPI 3.0 & OpenDaylight: A PANTHEON.tech Initiative

June 12, 2020/in Blog, OpenDaylight /by PANTHEON.tech

PANTHEON.tech has created a commit in the official OpenDaylight repository, which updates the version of Swagger generator to OpenAPI 3.0.

This feature allows us to easily generate a JSON with RESTCONF API documentation of OpenDaylight RESTCONF applications and import it into various services, such as ServiceNow®. This feature is not only about the generation of JSON with OpenAPI. It also includes Swagger UI based on generated JSON.

What is RESTCONF API?

RESTCONF API is an interface, which allows access to datastores in the controller, via HTTP requests. OpenDaylight supports two versions of RESTCONF protocol:

  • draft-bierman-netconf-restconf-02
  • RFC8040.

What is OpenAPI?

OpenAPI, formerly known as Swagger UI, visualizes API resources and enables the user to interact with them. This kind of visualization provides an easier way to implement APIs in the back-end while automating the creation of documentation for the APIs in question.

OpenAPI Specification on the other hand (OAS for short), is a language-agnostic interface description for RESTful APIs. Its purpose is to visualize them and make the APIs readable for people and PCs alike, in YAML or JSON formats.

OAS 3.0 introduced several major changes, which made the specification structure clearer and more efficient. For a rundown of changes from OpenAPI 2 to version 3, make sure to visit this page detailing them.

How does it work?

OpenAPI is generated on the fly, with every manual request for the OpenAPI specification of the selected resource. The resource can be the OpenDaylight datastore or a device mount point. 

You can conveniently access the list of all available resources over the apidoc web application. The resources are located on the top right part of the screen. Once you select the resource you want to generate the OpenAPI specification for, you just pick the desired resource and the OpenAPI specification will be displayed below.

OpenAPI 3.0 (Swagger) in OpenDaylight

The apidoc is packed within the odl-restconf-all Karaf feature. To access it, you only need to type

feature:install odl-restconf-all

in the Karaf console. Then, you can use a web browser of your choice to access the apidoc web application over the following URL:

http://localhost:8181/apidoc/explorer/index.html

Once an option is selected, the page will load the documentation of your chosen resource, with the chosen protocol version.

The documentation of any resource endpoint (node, RPC’s, actions), is located under its module spoiler. When you click on the link:

http://localhost:8181/apidoc/openapi3/${RESTCONF_version}/apis/${RESOURCE}

you will get the OpenAPI JSON for the particular RESTCONF version and selected resource. Here is a code snippet from the resulting OpenAPI specification:

{
  "openapi": "3.0.3",
  "info": {
    "version": "1.0.0",
    "title": "simulator-device21 modules of RestConf version RFC8040"
  },
  "servers": [
    {
      "url": "http://localhost:8181/"
    }
  ],
  "paths": {
    "/rests/data/network-topology:network-topology/topology=topology-netconf/node=simulator-device21/yang-ext:mount": {
      "get": {
        "description": "Queries the operational (running) datastore on the mounted hosted.",
        "summary": "GET - simulator-device21 - data",
        "tags": [
          "mounted simulator-device21 GET root"
        ],
        "responses": {
          "200": {
            "description": "OK"
          }
        }
      }
    },
    "/rests/operations/network-topology:network-topology/topology=topology-netconf/node=simulator-device21/yang-ext:mount": {
      "get": {
        "description": "Queries the available operations (RPC calls) on the mounted hosted.",
        "summary": "GET - simulator-device21 - operations",
        "tags": [
          "mounted simulator-device21 GET root"
        ],
        "responses": {
          "200": {
            "description": "OK"
          }
        }
      }
    }
...

You can look through the entire export by clicking here.

Our Commitment to Open-Source

PANTHEON.tech is one of the largest contributors to the OpenDaylight source-code, with extensive knowledge that goes beyond a general service or integration.

This just goes to show, that PANTHEON.tech is heavily involved in the development and progress of OpenDaylight. We are glad to be part of the open-source community and contributors.


You can contact us at https://pantheon.tech/

Explore our PANTHEOn.tech GitHub.

Watch our YouTube Channel.

network automation

[Hands-On] Network Automation with ServiceNow® & OpenDaylight

May 13, 2020/in Blog, OpenDaylight /by PANTHEON.tech

by Miroslav Kováč | Leave us your feedback on this post!

PANTHEON.tech s.r.o., its products or services, are not affiliated with ServiceNow®, neither is this post an advertisement of ServiceNow® or its products.

ServiceNow® is a complex cloud application, used to manage companies, their employees, and customers. It was designed to help you automate the IT aspects of your business – service, operations, and business management. It creates incidents where using flows, you can automate part of the work that is very often done manually. All this can be easily set up by any person, even if you are not a developer.

An Example

If a new employee is hired in the company, he will need access to several things, based on his position. An incident will be created in ServiceNow® by HR. This will trigger a pre-created, generic flow, which might, for example, notify his direct supervisor (probably manager) and he would be asked to approve this request of access.

Once approved, the flow may continue and set everything up for this employee. It may notify the network engineer, to provision the required network services like (VPN, static IPs, firewall rules, and more), in order to give a new employee a computer. Once done, he will just update the status of this task to done, which may trigger another action. It can automatically give him access to the company intranet. Once everything is done, it will notify everyone it needs to, about a successful job done, with an email or any other communication resource the company is using.

Showing the ServiceNow® Flow Designer


Setting Up the Flow

Let’s take it a step further, and try to replace the network engineer, who has to manually configure the services needed for the device.

In a simple environment with a few network devices, we could set up the ServiceNow® Workflow, so that it can access them directly and edit the configuration, according to the required parameters.

In a complex, multi-tenant environment we could leverage a network controller, that can serve the required service and maintain the configuration of several devices. This will make the required service functional. In that case, we will need ServiceNow® to communicate with the controller, which secures this required network service.

The ServiceNow® orchestration understands and reads REST, OpenDaylight & lighty.io – in our case, the controller. It provides us with the RESTCONF interface, with which we can easily integrate ServiceNow®, OpenDaylight, or lighty.io, thanks to the support of both these technologies.

Now, we look at how to simplify this integration. For this purpose, we used OpenAPI.

This is one of the features, thanks to which we can generate a JSON according to the OpenAPI specification for every OpenDaylight/lighty.io application with RESTCONF, which we can then import into ServiceNow®.

If your question is, whether it is possible to integrate a network controller, for example, OpenDaylight or lighty.io, the answer is yes. Yes, it is.

Example of Network Automation

Let’s say we have an application with a UI, that will let us manage the network with a control station. We want to connect a new device to it and set up its interfaces. Manually, you would have to make sure that the device is running. If not, we have to contact IT support to plug it in, create a request to connect to it. Once done, we have to create another request to set up the interfaces and verify the setup.

Using flows in ServiceNow® will let you do all that automatically. All your application needs to do, is create an incident in ServiceNow ®. This incident would be set up as a trigger, for a flow to start. It would try to create a connection using a REST request, that would be chosen from API operations, which we have from our OpenAPI JSON. This was automatically generated from YANG files, that are used in the project.

If a connection fails, then it would automatically send an email to IT support, creating a new, separate incident, that would have to be marked as done before this flow can continue. Once done, we can try to connect again using the same REST. When the connection is successful, we can choose a new API operation again, that would process the interfaces.

After that, we can choose another API operation that would get all the created settings and send that to the person, that created this incident using an email and mark this incident as done.

OpenAPI & oneOf

Showing the ServiceNow® API Operation

Since the “New York” release of ServiceNow®, the import of OpenAPI is a new feature, it has some limitations.

During usage, we noticed a few inconsistencies, which we would like to share with you. Here are some tips, what you should look out for when using this feature.

OpenAPI & ServiceNow®

OpenAPI supports the oneOf feature, which is something that is needed for choice keywords in YANG. You can choose, which nodes you want to use. Currently, the workaround for this is to use the Swagger 2.0 implementation, which does not support the oneOf feature and will list all the cases that exist in a choice statement. If you go to input variables, you may delete any input variables that you don’t want yourself.

JSONs & identical item names

Another issue is when we have a JSON that contains the same item names in different objects or levels. So if I need the following JSON:

{
    "username": "foo",
    "password": "bar":,
    "another-log-in": {
        "username": "foo",
        "password": "bar"
    }
}

The workaround is, to add other input variables manually, that will have the same name, like the one that is missing. Suddenly, it may appear twice in input variables, but during testing, it appears only once – where it’s supposed to. Therefore, you need to manually fill in all the missing variables using the “+” button in the input variables tab.we have the username and password twice. However, it would appear in the input variables just once. When testing the action, I was unable to fill it in like the above JSON.

showing the ServiceNow® inputs

Input Variables in ServiceNow®

The last issue that we have, is with ServiceNow® not requiring input variables. Imagine you create an action with REST Step. If there are some variables that you don’t need to set up, you would normally not assign any value to that variable and it would not be set.

Here, it would automatically set it to a default value or an empty string if there is no default value, which can cause some problems with decimals as well – since you should not put strings into a decimal variable.

Again, the workaround is to remove all the input variables, that you are not going to use.

This concludes our network automation with the ServiceNow guide. Leave us your feedback on this post!


You can contact us at https://pantheon.tech/

Explore our Pantheon GitHub.

Watch our YouTube Channel.

YANG Tools 2.0.1 integrated in ODL Oxygen

YANG Tools 2.0.1 integrated in OpenDaylight Oxygen

March 19, 2018/in Blog, OpenDaylight /by PANTHEON.tech

OpenDaylight’s YANG Tools project, forms the bottom-most layer of OpenDaylight as an application platform. It defines and implements interfaces for modeling, storing and transforming data modeled in RFC7950, known as YANG 1.1 — such as a YANG parser and compiler.

What is YANG Tools?

Pantheon engineers started developing yangtools some 5 years ago. It originally supported RFC6020, going through a number of different versions. After releasing yangtools-1.0.0, we introduced semantic versioning as an API contract. Since then, we have retrofitted original RFC6020 meta-model to support RFC7950. We also implemented the corresponding parser bits, which were finalized in yangtools-1.2.0 and shipped with the Nitrogen Simultaneous Release.

This release entered its development phase on August 14th 2017. yangtools-2.0.0 was released on November 27th 2017, which is when the search of an integration window started. Even though we had the most critical downstream integration patches prepared, most of down-streams did not have their patches even started. Integration work and coordination was quickly escalated to the TSC. The integration finally kicked off on January 11, 2018.

Integration was mostly complicated by the fact that odlparent-3.0.x was riding with us, along with the usual Karaf/Jetty/Jersey/Jackson integration mess. It is now sorted out, with  yangtools-2.0.1 being the release to be shipped in the Oxygen simultaneous Release.

What is new in yangtools-2.0.1?

  • 309 commits
  • 2009 files changed
  • 54126 insertions(+)
  • 45014 deletions(-)

The most user-visible change is that in-memory data tree now enforces mandatory leaf node presence for operational store by default. This can be tweaked via the DataTreeConfiguration interface on a per-instance basis, if need be, but we recommend against switching it off.

For downstream users using karaf packaging, we have split our features into stable and experimental ones. Stable features are available from features-yangtools and contain the usual set of functionality, which will only expand in its capabilities. Experimental features are available from features-yangtools-experimental and carry functionality which is not stabilized yet and may get removed — this currently includes ObjectCache, which is slated for removal, as Guava’s Interners are better suited for the job.

Users of yang-maven-plugin will find that YANG files packaged in jars now have their names normalized to RFC7950 guidelines. This includes using the actual module or submodule name as well as capturing the revision in the filename.

API Changes

From API change perspective, there are two changes which stand out. We have pruned all deprecated methods and all YANG 1.1 API hacks marked with ‘FIXME: 2.0.0’ have been cleared up. This results in better ergonomics for both API users and implementors.

yang-model-api has seen some incompatible changes, ranging from renaming of AugmentationNode, TypedSchemaNode and ChoiceCaseNode to some targetted use of Optional instead of nullable returns. Most significant change here is the introduction of EffectiveStatement specializations — I will cover these in detail in a follow-up post, but these have enabled us to do the next significant item.

YANG parser has been refactored into multiple components. Its internal structure changed, in order to hide most of the implementation classes and methods. It is now split into:

  • yang-parser-reactor (language-independent inference pipeline)
  • yang-parser-rfc7950 (hosting baseline RFC6020/RFC7950 parser)
  • yang-parser-impl (being the default-configured parser instance)
  • and a slew of parser extensions (RFC6536, RFC7952, RFC8040)

There is an yang-parser-spi artifact, too, which hosts common namespaces and utility classes, but its layout is far from stabilized. Overall the parser has become a lot more efficient, better at detecting and reporting model issues. Implementing new semantic extensions has become really a breeze.

YANG Codecs

YANG codecs have seen a major shift, with the old XML parser in yang-data-impl removed in favor of yang-data-codec-xml. yang-data-codec-gson gains the ability to parse and emit RFC7951 documents. This allows RFC8040 NETCONF module to come closer to full compliance. Since the SchemaContext is much more usable now, with Modules being indexed by their  NameModule, the codec operations have become significantly faster.

Overall, we are in a much better and cleaner shape. We are currently not looking at a 3.0.0 release anytime soon and can actually deliver incremental improvements to YANG Tools in a much more rapid cadence than previously possible with the entire OpenDaylight simultaneous release cycle being in the way.

We already have another round of changes ready for yangtools-2.0.2 and are looking forward to publishing them.

Robert Varga

More @ PATHEON.tech

  • [What Is] VLAN & VXLAN
  • [What Is] Whitebox Networking?
  • [What Is] BGP EVPN?
© 2025 PANTHEON.tech s.r.o | Privacy Policy | Cookie Policy
  • Link to LinkedIn
  • Link to Youtube
  • Link to X
  • Link to Instagram
Manage Consent
To provide the best experiences, we use technologies like cookies to store and/or access device information. Consenting to these technologies will allow us to process data such as browsing behavior or unique IDs on this site. Not consenting or withdrawing consent, may adversely affect certain features and functions.
Functional Always active
The technical storage or access is strictly necessary for the legitimate purpose of enabling the use of a specific service explicitly requested by the subscriber or user, or for the sole purpose of carrying out the transmission of a communication over an electronic communications network.
Preferences
The technical storage or access is necessary for the legitimate purpose of storing preferences that are not requested by the subscriber or user.
Statistics
The technical storage or access that is used exclusively for statistical purposes. The technical storage or access that is used exclusively for anonymous statistical purposes. Without a subpoena, voluntary compliance on the part of your Internet Service Provider, or additional records from a third party, information stored or retrieved for this purpose alone cannot usually be used to identify you.
Marketing
The technical storage or access is required to create user profiles to send advertising, or to track the user on a website or across several websites for similar marketing purposes.
Manage options Manage services Manage {vendor_count} vendors Read more about these purposes
View preferences
{title} {title} {title}
Scroll to top