[NSO Guide] Cisco NSO with SDN-C (ONAP)
by Samuel Kontriš | Leave us your feedback on this post!
Welcome to the third and final part of our guide on Cisco’s Network Service Orchestrator. In previous parts, we managed to install and run the NSO on Ubuntu & connected it with lighty.io
Prerequisites
This tutorial was tested on Ubuntu 18.04 LTS. In this tutorial, we are going to use:
- Docker
- (Optional) Postman as a REST client
- Cisco NSO we installed in the previous tutorial.
Get and start SDN-C
We will download and start SDN-C with only necessary components using Docker. All ONAP Docker images will be downloaded directly from docker-hub.
Create a file called docker-compose.yml with the following content:
version: '2.1'

networks:
  default:
    driver: bridge
    driver_opts:
      com.docker.network.driver.mtu: 1500


services:
  db:
    image: mysql/mysql-server:5.6
    container_name: sdnc_db_container
    ports:
      - "3306"
    environment:
      - MYSQL_ROOT_PASSWORD=openECOMP1.0
      - MYSQL_ROOT_HOST=%
    logging:
      driver:   "json-file"
      options:
        max-size: "30m"
        max-file: "5"

  ansible:
    image: onap/sdnc-ansible-server-image:1.7.7
    depends_on :
      - db
    container_name: sdnc_ansible_container
    entrypoint: ["/opt/onap/ccsdk/startAnsibleServer.sh"]
    ports:
      - "8000"
    links:
      - db:dbhost
      - db:sdnctldb01
      - db:sdnctldb02
    environment:
      - MYSQL_ROOT_PASSWORD=openECOMP1.0
    logging:
      driver:   "json-file"
      options:
        max-size: "30m"
        max-file: "5"

  sdnc:
    image: onap/sdnc-image:1.7.7
    depends_on :
      - db
    container_name: sdnc_controller_container
    entrypoint: ["/opt/onap/sdnc/bin/startODL.sh"]
    ports:
      - "8282:8181"
    links:
      - db:dbhost
      - db:sdnctldb01
      - db:sdnctldb02
      - ansible:ansiblehost
    environment:
      - MYSQL_ROOT_PASSWORD=openECOMP1.0
      - SDNC_CONFIG_DIR=/opt/onap/sdnc/data/properties
    dns:
      - ${DNS_IP_ADDR-10.0.100.1}
    logging:
      driver:   "json-file"
      options:
        max-size: "30m"
        max-file: "5"
    extra_hosts:
        aaf.osaaf.org: 10.12.6.214

  dgbuilder:
    image: onap/ccsdk-dgbuilder-image:0.7.0
    depends_on:
      - db
      - sdnc
    container_name:  sdnc_dgbuilder_container
    entrypoint:
       - "/bin/bash"
       - "-c"
       - "cd /opt/onap/ccsdk/dgbuilder/ && ./start.sh sdnc1.0 && wait"
    ports:
      - "3000:3100"
    links:
      - db:dbhost
      - db:sdnctldb01
      - db:sdnctldb02
      - sdnc:sdnhost
    environment:
      - MYSQL_ROOT_PASSWORD=openECOMP1.0
      - SDNC_CONFIG_DIR=/opt/onap/ccsdk/data/properties
    logging:
      driver:   "json-file"
      options:
        max-size: "30m"
        max-file: "5"
This docker-compose file is based on this one from the official sdnc/oam Gerrit repository. The most important images are dgbuilder (which will start a webserver, where directed graphs can be created) and sdnc (the SDN-Controller itself).
To download and start images specified in the docker-compose file call this command:
docker-compose up
Be patient, it may take a while.
In the end, when everything is up & running, we should see a log stating that Karaf was started successfully. It should look similar to this:
sdnc_controller_container | Karaf started in 0s. Bundle stats: 12 active, 12 total
Directed Graph builder should be accessible through this address (port is specified in the docker-compose file):
https://localhost:3000
Default login for dgbuilder is:
username: dguser
password: test123
Upload and activate Directed Graphs
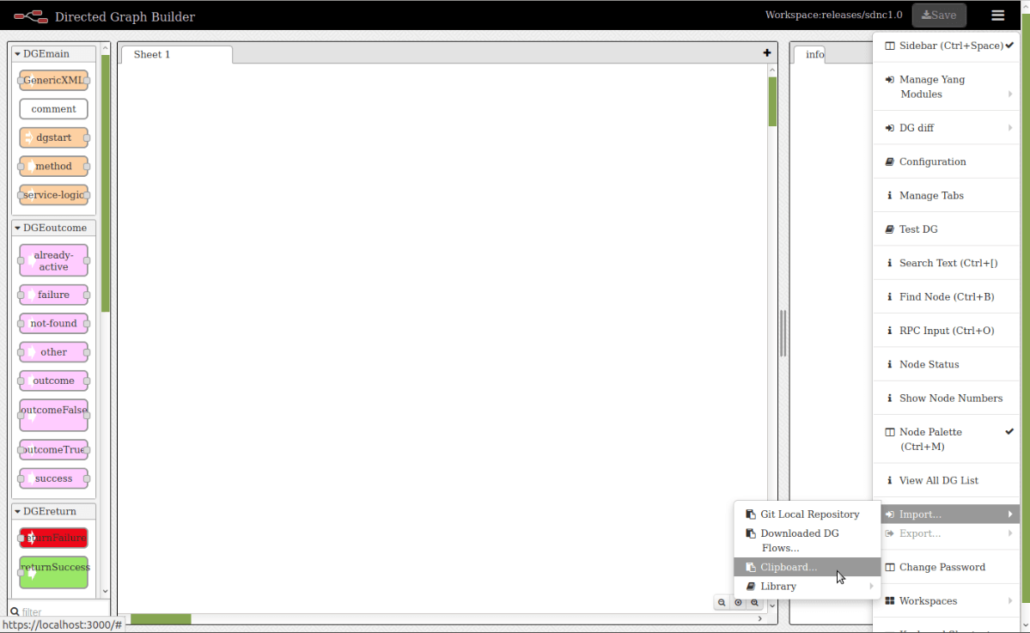
Steps how to upload DG from clipboard:
- On the upper right side of the webpage click on the menu button
- In the menu click on the “Import…” button
- Select “Clipboard…” option
- Paste json representation of the graph to the text field
- Click “Ok”
- Place graph on the sheet
Steps to activate DG:
- Click on the small square at the left side of the beginning of the graph (DGSTART node)
- Click on the “Upload XML” button
- Click on the “ViewDGList” button
- Click on the “Activate” button in the “Activate/Deactivate” column of the table
- Click on the “Activate” button

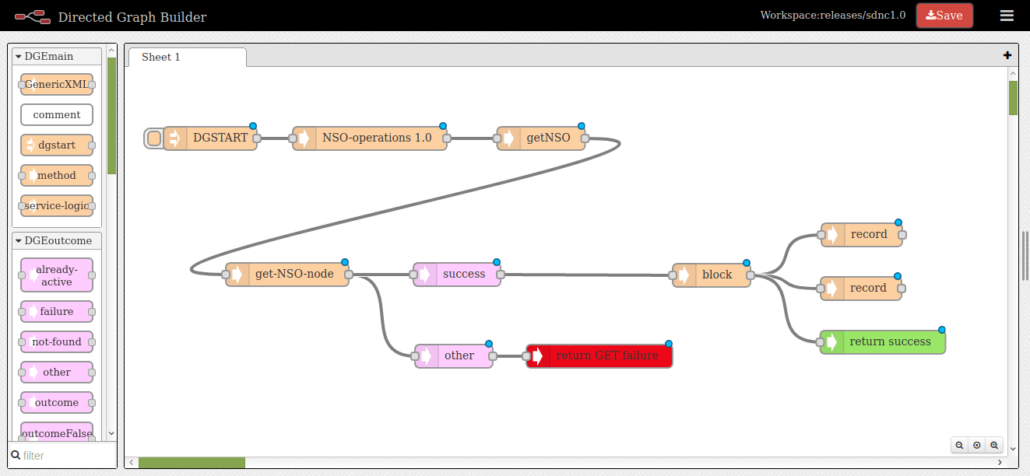
In these files are exported, parametrized Directed Graphs to connect your Cisco NSO instance via NETCONF protocol. You can get information about connected the Cisco NSO instance from the operational datastore. To activate ACL service (that we created in this tutorial). We will use these in later steps, so you can upload and activate them in your SDN-C instance.
You can download the corresponding JSON files here:
Connect Cisco NSO to SDN-C using DG
In the previous tutorial, we started Cisco NSO with three simulated devices. Now, we are going to connect a running Cisco NSO instance to SDN-C, using the directed graphs we just imported and activated.
But first, we need to obtain the address of Cisco NSO which we will use in the connect request. Run docker inspect command from the terminal like this:
docker inspect sdnc_controller_container
Search for “NetworkSettings” – “Networks” – “yaml_default” – “Gateway”. The field “Gateway” contains an IP address that we will use, so save it for later. In my case it looks like this:
...
"Gateway": "172.18.0.1",
...
Now, we are going to connect to the SDN-C Karaf so we can see the log because some of the DGs write information in there. Execute these commands:
docker exec -it sdnc_controller_container /bin/bash
cd /opt/opendaylight/bin/
./client
log:tail
To execute the Directed Graph, call RESTCONF RPC SLI-API: execute-graph. To do this, call a POST request on URI:
http://localhost:8282/restconf/operations/SLI-API:execute-graph
With payload:
{
  "input": {
    "module-name": "<module-name>",
    "rpc-name": "<rpc-name>",
    "mode": "sync",
    "sli-parameter": [
        {
            "parameter-name": "param1",
            "string-value": "val1"
        }
    ]
  }
}
Where <module-name> is the name of the module, where the RPC you want to call is located. <rpc-name> is the name of the RPC. Additionally, you can specify parameters if they are required. We are using port 8282, which we specified in the docker-compose file.
This Postman collection contains all the requests we are going to use now. Feel free to change any attributes, according to your needs.
To connect the Cisco NSO instance, we are going to execute the connectNSO directed graph. Execute SLI-API:execute-graph RPC with this payload:
{
  "input": {
    "module-name": "NSO-operations",
    "rpc-name": "connectNSO",
    "mode": "sync",
    "sli-parameter": [
        {
            "parameter-name": "nodeId",
            "string-value": "nso"
        },
        {
            "parameter-name": "nodeAddress",
            "string-value": "172.18.0.1"
        },
        {
            "parameter-name": "nodePort",
            "string-value": "2022"
        },
        {
            "parameter-name": "nodeUser",
            "string-value": "admin"
        },
        {
            "parameter-name": "nodePassword",
            "string-value": "admin"
        }
    ]
  }
}
Don’t forget to set the correct nodeAddress to this request – we got this value before by executing the docker inspect command.
The parameter nodeId specifies the name, under which we will address Cisco NSO in SDN-C. Other parameters are default for the Cisco NSO.
After executing this RPC, we should see our DG – ID of the Cisco NSO node and its connection status (which will be most probably “connecting”), in the SDN-C logs output.
...
12:57:14.654 INFO [qtp1682691455-1614] About to execute node #2 block node in graph SvcLogicGraph [module=NSO-operations, rpc=getNSO, mode=sync, version=1.0, md5sum=f7ed8e2805f0b823ab05ca9e7bb1b997]
12:57:14.656 INFO [qtp1682691455-1614] About to execute node #3 record node in graph SvcLogicGraph [module=NSO-operations, rpc=getNSO, mode=sync, version=1.0, md5sum=f7ed8e2805f0b823ab05ca9e7bb1b997]
12:57:14.671 INFO [qtp1682691455-1614] |Node ID is: nso|
12:57:14.672 INFO [qtp1682691455-1614] About to execute node #4 record node in graph SvcLogicGraph [module=NSO-operations, rpc=getNSO, mode=sync, version=1.0, md5sum=f7ed8e2805f0b823ab05ca9e7bb1b997]
12:57:14.674 INFO [qtp1682691455-1614] |Connection status is: connecting|
...
To check if Cisco NSO node was connected successfully, call getNSO DG. Execute SLI-API:execute-graph RPC with payload:
{
  "input": {
    "module-name": "NSO-operations",
    "rpc-name": "getNSO",
    "mode": "sync",
    "sli-parameter": [
        {
            "parameter-name": "nodeId",
            "string-value": "nso"
        }
    ]
  }
}
In the SDN-C logs, we should now see the “connected” status:
...
13:02:15.888 INFO [qtp1682691455-188] About to execute node #2 block node in graph SvcLogicGraph [module=NSO-operations, rpc=getNSO, mode=sync, version=1.0, md5sum=f7ed8e2805f0b823ab05ca9e7bb1b997]
13:02:15.889 INFO [qtp1682691455-188] About to execute node #3 record node in graph SvcLogicGraph [module=NSO-operations, rpc=getNSO, mode=sync, version=1.0, md5sum=f7ed8e2805f0b823ab05ca9e7bb1b997]
13:02:15.892 INFO [qtp1682691455-188] |Node ID is: nso|
13:02:15.893 INFO [qtp1682691455-188] About to execute node #4 record node in graph SvcLogicGraph [module=NSO-operations, rpc=getNSO, mode=sync, version=1.0, md5sum=f7ed8e2805f0b823ab05ca9e7bb1b997]
13:02:15.895 INFO [qtp1682691455-188] |Connection status is: connected|
...
Activate Cisco NSO service using Directed Graph
We are now going to activate the ACL service we created in this tutorial, by executing activateACL directed graph.
Execute SLI-API:execute-graph RPC with this payload:
{
  "input": {
    "module-name": "NSO-operations",
    "rpc-name": "activateACL",
    "mode": "sync",
    "sli-parameter": [
        {
            "parameter-name": "nodeId",
            "string-value": "nso"
        },
        {
            "parameter-name": "aclName",
            "string-value": "aclFromDG"
        },
        {
            "parameter-name": "aclDirection",
            "string-value": "in"
        },
        {
            "parameter-name": "aclDeviceName",
            "string-value": "c1"
        },
        {
            "parameter-name": "aclInterfaceType",
            "string-value": "GigabitEthernet"
        },
        {
            "parameter-name": "aclInterfaceNumber",
            "string-value": "1/1"
        }
    ]
  }
}
Feel free to change the values of ACL parameters (but first check what types they are in the ACL service YANG model).
Unfortunately, at the time of writing this tutorial, there is a bug in the OpenDaylight NETCONF (NETCONF-568) with parsing output from this RPC call. It prevents the ODL from sending a response to the RESTCONF request we sent (SLI-API:execute-graph RPC) and we need to manually stop waiting for this response in the Postman (or another REST client you are using).
Now, the service should be activated! To check services activated in the Cisco NSO call GET request on URI:
http://localhost:8282/restconf/operational/network-topology:network-topology/topology/topology-netconf/node/nso/yang-ext:mount/tailf-ncs:services
In response, you should see all activated services including our with name “aclFromDG”:
...
        "acl-service:acl-service": [
            {
                "ACL_Name": "aclFromDG",
                "ACL_Direction": "in",
                "devices": [
                    {
                        "device_name": "c1",
                        "interfaces": [
                            {
                                "interface_type": "GigabitEthernet",
                                "interface_number": "1/1"
                            }
                        ]
                    }
                ],
                "directly-modified": {
                    "devices": [
                        "c1"
                    ]
                },
                "device-list": [
                    "c1"
                ],
                "modified": {
                    "devices": [
                        "c1"
                    ]
                }
            }
        ]
...
To check if the device was configured log into Cisco NSO CLI and execute show command:
ncs_cli -u admin
show configuration devices device c1 config ios:interface
You should see an output, similar to this:
admin@ncs> show configuration devices device c1 config ios:interface
FastEthernet 1/0;
GigabitEthernet 1/1 {
    ip {
        access-group {
            access-list aclFromDG;
            direction   in;
        }
    }
}
Congratulations
You have successfully connected SDN-C with the Cisco NSO and concluded our series! In case you would like a custom integration, feel free to contact us.
Our previous articles in this series include:
- Starting Cisco NSO
- Connecting lighty.io with Cisco NSO
3/24/2020 Update: Small tweaks in the code used in our demonstration, enjoy!
You can contact us at https://pantheon.tech/
Explore our Pantheon GitHub.
Watch our YouTube Channel.


